


Zero-Exposure Data Mobility: AWS PrivateLink Cross-Account Database Migration Blueprint Using AWS DMS
24/04/2026
494

The Mission: A High-Stakes Database Relocation
Some migrations are straightforward. This one was not.
The goal was clear on paper: execute an AWS PrivateLink cross-account database migration involving approximately 100 GB of sensitive data from a source database in AWS Account A to a destination database in Account B. But two requirements immediately raised the stakes. First, the data consisted entirely of personally identifiable information (PII), the kind that demands careful handling, strong isolation, and an auditable access model. Second, the business required that total application downtime be kept as low as possible. Not low in relative terms. As low as possible.
Those two constraints together: sensitive data and near-zero downtime, set the terms for everything that followed. This was not a lift-and-shift. It was not a simple backup-and-restore. It was a precision operation that had to satisfy security, compliance, and continuity requirements simultaneously.
What made it genuinely interesting from an architecture standpoint was a third constraint that was only revealed once the team sat down to plan: the usual options for cross-account connectivity were not available.
The Wall of Constraints
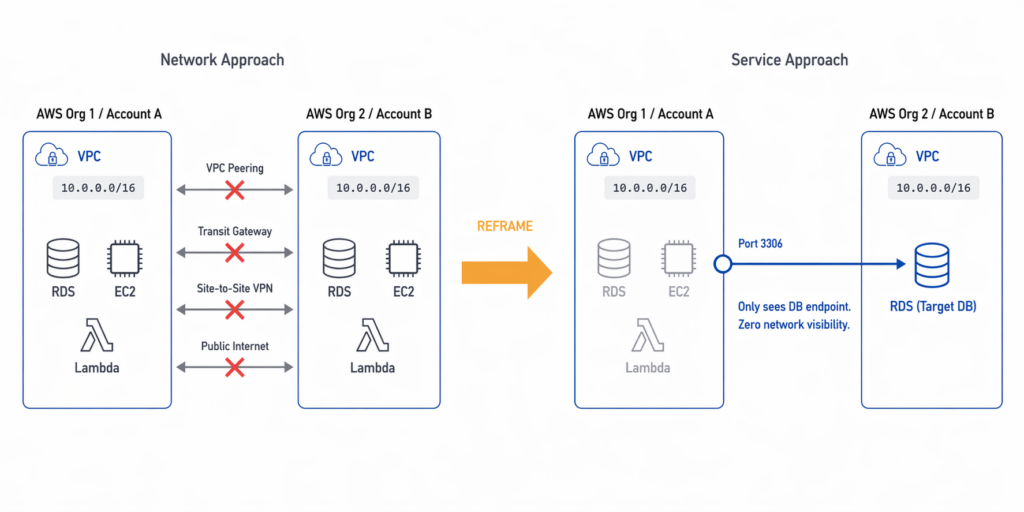
When the team began mapping out connectivity options, a strict set of mandatory security and networking restrictions quickly eliminated the standard approaches.
The two accounts belonged to separate AWS Organizations. Both VPCs used the same CIDR range, 10.0.0.0/16, which made peering-based routing impossible even before the security policy was considered. But the policy itself went further. VPC peering was explicitly forbidden. Transit Gateway was excluded by the same rule. Public internet exposure was off the table because PII data cannot be routed outside the AWS backbone. Site-to-site VPN fell under the same prohibition.
At first glance, this looks like a wall. Four separate mechanisms for cross-account connectivity, all blocked.
But the right response to a wall of constraints is not to look for a way around them. It is to ask why they exist. Once the team understood the purpose of these restrictions, the solution became clear.
The Breakthrough: Shifting from Network Connectivity to Service Connectivity
The security policy was not bureaucracy. It was blast-radius control.
If Account B were ever compromised, the attacker should not be able to scan Account A’s subnets, discover its resources, enumerate its route tables, or pivot across a peered network. That is the logic behind forbidding VPC peering and Transit Gateway. Both patterns create network-level adjacency, broad and bidirectional visibility between environments. In a segmented architecture, that visibility is the attack surface you are trying to avoid.
Once the team internalized that reasoning, the design question changed completely.
- The old question: How do we connect two networks?
- The new question: How do we expose exactly one service, to exactly one consumer, with zero additional visibility?
That reframing is the intellectual center of this entire design. And the answer to the new question and the key to a successful AWS PrivateLink cross-account database migration is shifting the focus from the network to the service.
The Architectural Blueprint: A PrivateLink Proxy
AWS PrivateLink was introduced in 2017 and is designed precisely for this kind of problem. In the context of an AWS PrivateLink cross-account database migration, it enables service-level connectivity between VPCs, including across account and organization boundaries, without creating network-level adjacency.
Traffic travels entirely within the AWS backbone infrastructure, isolated from the public internet. Access control happens at the service boundary, not at the network layer. For this migration, those properties were exactly what was needed.
However, there is one important technical nuance to understand upfront. PrivateLink cannot connect directly to an RDS instance; RDS is not a VPC Endpoint Service and does not expose itself as a consumable PrivateLink target. This means the specific architecture for our AWS PrivateLink cross-account database migration requires an intermediary layer that can serve as the actual PrivateLink target and proxy traffic to the database.
That intermediary is a Network Load Balancer deployed in Account A, in front of the RDS instance.
The resulting traffic path has four hops:
[DMS Replication Instance — Account B VPC]
          ↓
[Interface Endpoint — Account B, 10.0.2.100:3306]
          ↓  (AWS backbone, private, no public internet)
[VPC Endpoint Service — Account A]
          ↓
[Network Load Balancer — Account A (Proxy Layer)]
          ↓
[RDS Instance — Account A, 10.0.1.50:3306]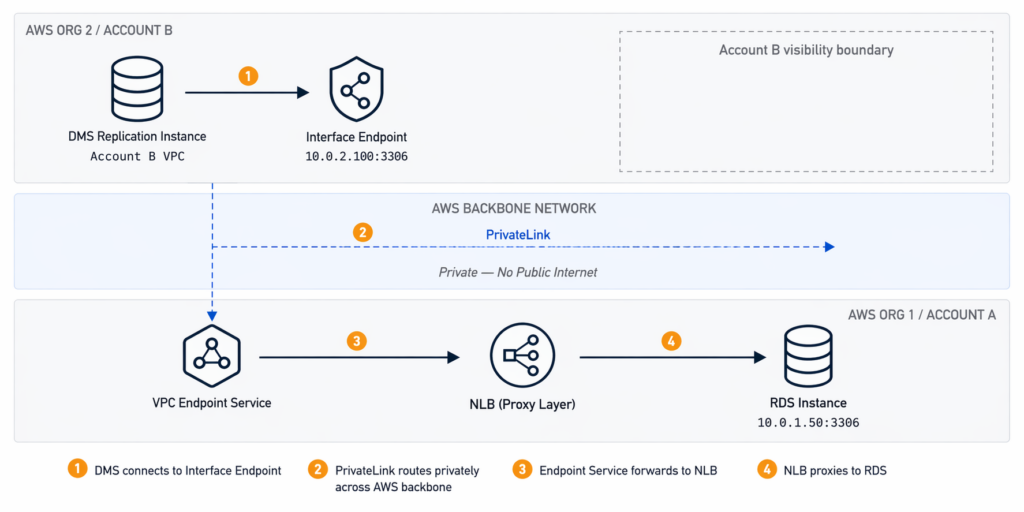
From Account B’s perspective, it sees only the Interface Endpoint. It cannot observe Account A’s network topology, route tables, subnets, or any other resources behind the service boundary. The migration path exists. The network visibility does not.
A note on encryption: PrivateLink keeps traffic private by routing it within AWS infrastructure and does not traverse the public internet. However, PrivateLink does not itself encrypt the database payload. For data-in-transit encryption, TLS must be explicitly configured at the database connection layer. This means requiring SSL on the RDS instance and configuring the DMS endpoint to use TLS. For a migration involving PII, this is a required configuration step, not an optional one.
Proving the Security Model
Before any migration work could begin, the security team required proof that the architecture actually achieved zero network visibility, not just in theory, but in practice.
The team demonstrated two proof points.
Proof Point 1: Network Invisibility
From Account B, the team ran standard network reconnaissance against Account A’s address space. ICMP ping to the source VPC’s IP range returned 100% packet loss. Traceroute could not resolve network hops beyond the AWS backbone infrastructure, leaving the source network topology completely opaque from the consumer side.
This is the expected behavior of PrivateLink. Services behind it are invisible at the network layer. There is no route to discover them, no ICMP path to follow, and no way to enumerate what else exists in the provider VPC.
Proof Point 2: Layered Access Control at the Endpoint
Security Groups were applied to the Interface Endpoint’s ENI in Account B, restricting inbound access to TCP port 3306 from the DMS replication instance’s subnet only, specifically 10.0.2.0/24. No broad CIDR trust was required. No internet-facing inbound rules were opened. The attack surface of the migration path was limited to a single port, a single protocol, and a single permitted source.
The combination of these two proof points satisfied the security team’s requirements and allowed the migration to proceed.
Critical Decisions in the Field
Architecture diagrams are clean. Production migrations are not. Two operational decisions had an outsized impact on the outcome.
Decision 1: Where to place the DMS replication instance
The DMS instance can be deployed in either account. The instinct might be to place it close to the source, near the data being read. But this is the wrong optimization.
The real bottleneck in a low-downtime migration is not read speed from the source. It is write speed to the target. During CDC synchronization, DMS must write every replicated change to the destination database fast enough to keep replication lag declining toward zero. If the DMS instance is far from the target, write latency compounds and the lag window before cutover grows.
Placing the DMS instance in Account B, close to the destination RDS, minimizes write latency and gives the team its best chance of reaching near-zero lag before cutover.
Decision 2: How to handle the NLB target when RDS uses DNS
This is the subtlest and most operationally dangerous issue in the entire design.
NLB target groups require IP addresses. RDS endpoints are DNS names. In a Multi-AZ deployment, the IP address behind that DNS name can change during a failover event. If it does during migration, the NLB target group still holds the old IP, the traffic path breaks, and the migration fails.
There is no fully automated fix that is simple to implement for a one-time migration. The practical response is a combination of preparation and monitoring. Resolve the RDS DNS endpoint to its current IP before the migration window and register that IP in the NLB target group. Schedule the migration during the lowest-traffic period available, which both reduces failover probability and reduces the write load DMS must keep up with. Configure CloudWatch alarms on key RDS metrics including DatabaseConnections, FreeableMemory, ReadIOPS, and ReplicaLag, with thresholds that give early warning of instability before it becomes a failover. Finally, define a clear decision rule in advance: if a Multi-AZ failover occurs before CDC stabilizes, reschedule the migration rather than attempt to recover mid-stream.
This is not a weakness in the architecture. It is an honest acknowledgment of how RDS Multi-AZ behaves, and the mitigation is operational discipline rather than a missing feature.
Prerequisites Before You Start
Two source-side conditions must be confirmed before any infrastructure is built. Both are easy to verify, and both will silently block the migration if overlooked.
Binary logging must be enabled on the source database.
DMS CDC depends entirely on the binary log. For MySQL-compatible engines, binlog_format must be set to ROW and the retention period must be long enough to cover the full load window, typically at least 24 hours. If binary logging is not active before the full load begins, DMS cannot establish a consistent CDC start point and the migration will need to restart from scratch.
The DMS replication instance must be appropriately sized.
An undersized instance becomes a bottleneck during the full load and cannot sustain CDC throughput before cutover. For a 100 GB dataset, dms.c5.xlarge is a reasonable starting point, but the right size depends on row count, average row width, and the source application’s write rate during migration hours. Run a test task against a non-production snapshot to validate throughput before committing to a migration window.
Migration Night: Three Phases, 28 Seconds of Downtime
The migration followed the standard low-downtime pattern: full load first, CDC second, cutover last. Each phase has a distinct purpose, and the transition between phases must be precise.
Phase 1: Full Load
The migration started at 10 PM on a Saturday, chosen for its low application traffic and low RDS activity. The DMS full load task began copying the existing dataset from Account A to Account B.
Total full load time: 2 hours and 15 minutes.
During the entire full load window, the production application continued running normally against the source database. Every write that occurred during those 2 hours and 15 minutes was recorded in the source binary log. That log is what makes the next phase possible.
Phase 2: Change Data Capture
Immediately after the full load completed, the CDC task started. DMS read changes from the source binary log beginning at the exact timestamp when the full load task was initiated, not when it finished. That means CDC replayed every write that occurred during the full load window, bridging the gap between the snapshot and the live state of the source database.
Within approximately 10 minutes, the two databases were synchronized to near real-time.
Replication metrics at steady state:
| Metric | Value |
| Replication lag | Under 1 second |
| CDC throughput | ~1,200 events per second |
| Network latency across PrivateLink | 3 to 5 milliseconds |
| Network status | Healthy and stable |
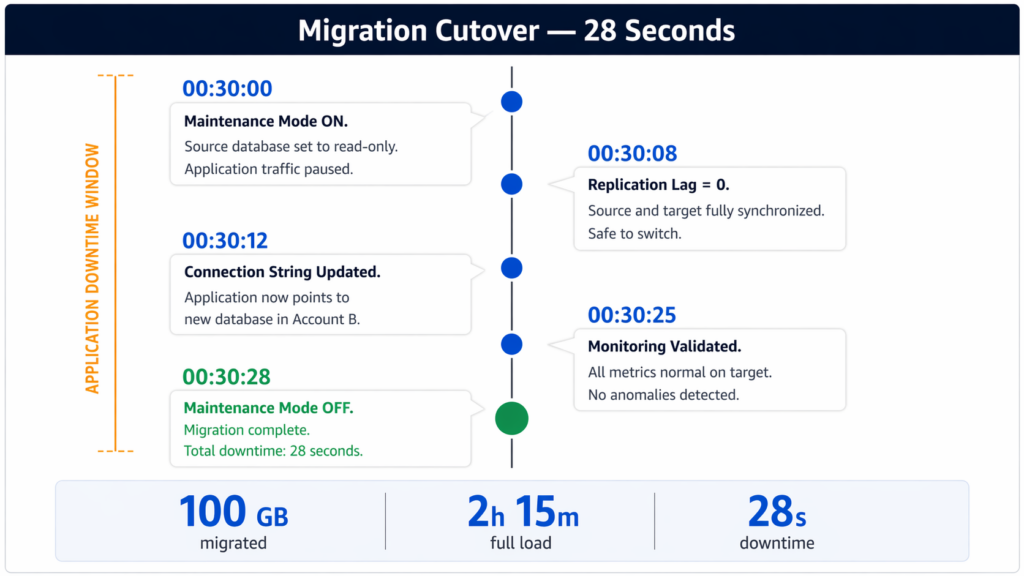
Phase 3: Cutover
At 00:30 AM, with replication lag stable and trending toward zero, the team began the cutover sequence. Every step was executed against a predefined checklist with timestamps:
| Time | Action |
| 00:30:00 | Maintenance mode enabled; source database set to read-only |
| 00:30:08 | CDC replication lag reached zero; source and target fully synchronized |
| 00:30:12 | Application connection string updated to the new database endpoint |
| 00:30:25 | All monitoring metrics confirmed normal on the target |
| 00:30:28 | Maintenance mode disabled; migration complete |
Total application downtime: 28 seconds.
The cutover was fast because all of the heavy work had already been completed. By the time the application switched, the databases were fully synchronized. The 28 seconds covered only the final coordination steps: enabling read-only mode, confirming zero lag, and flipping the connection string.
When to Use This Pattern and When Not To
This architecture solves a specific class of problem. It does not solve all problems.
Use this pattern when:
You need cross-account or cross-organization migration and VPC-level connectivity is restricted or forbidden by security policy. It is equally well suited for M&A scenarios where data must move between separate business entities without establishing permanent network trust. It is also the right choice for compliance workloads that require strict network isolation for audit purposes, such as those governed by PCI DSS or HIPAA.
Do not use this pattern when:
Bidirectional synchronization is needed, since this architecture is unidirectional by design. It is also not appropriate when the database is multi-terabyte and the initial full load window is impractically long. In those cases, AWS Snow Family for physical transport combined with DMS for CDC catch-up is a better approach. Finally, avoid this pattern for permanent, ongoing database connectivity between environments. It is a temporary migration endpoint, not a long-term inter-account access solution.
Cost Breakdown
For a three-day execution window covering setup, dry runs, and the production migration, the estimated infrastructure cost was as follows:
| Component | Cost |
| PrivateLink Interface Endpoint | ~$0.24/day + $0.01/GB processed (~$1.00 for 100 GB) |
| Network Load Balancer | ~$0.54/day + traffic charges (~$15 to $20/day) |
| DMS Instance (c5.xlarge) | ~$50 to $55/day |
| Total (3 days) | ~$180 to $250 |
To put that in context: for most production workloads, one hour of unplanned application downtime costs more than the entire migration infrastructure. The architecture is not just technically appropriate. It is economically reasonable by a wide margin.
Key Takeaways
Three lessons carry beyond this specific migration.
1. Context Over Convenience
Understand why constraints exist before trying to route around them. The security restrictions in this project were not arbitrary; they were blast-radius controls. Once the team understood that, the shift from network connectivity to service connectivity became the logical path for an AWS PrivateLink cross-account database migration, making the solution obvious rather than just “clever.”
2. Verification through Isolation
Zero network visibility is provable, not just claimed. In an AWS PrivateLink cross-account database migration, isolation is demonstrable through standard tooling. The fact that traceroute goes dark and ping returns nothing from the consumer side is not a side effect—it is the point. Security teams can verify this isolation before ever approving the final move.
3. Preparation is the Cutover
The cutover window is determined long before cutover night. A 28-second outage during an AWS PrivateLink cross-account database migration is not the result of fast fingers during the maintenance window. It is the result of completing all the heavy lifting—the full load, the CDC catch-up, and the lag stabilization—weeks in advance. By the time the application switches, the migration is already done. The cutover is just the announcement.
Need help reviewing AWS outbound traffic and designing least-privilege egress rules for production workloads? Talk to SupremeTech’s Cloud and DevOps team.
FAQs
Yes. A practical approach is to use AWS PrivateLink with a Network Load Balancer proxy in the source account to expose the database as a VPC Endpoint Service, and AWS DMS in the destination account to perform the actual data replication. This pattern avoids VPC peering, Transit Gateway, and public internet exposure, while keeping traffic entirely within the AWS backbone.
AWS RDS is not itself a VPC Endpoint Service. PrivateLink requires a Network Load Balancer as the backend target for any custom endpoint service. To expose an RDS instance through PrivateLink, a Network Load Balancer must be deployed in the same VPC as the source database, with the RDS instance registered as an IP-based target. The NLB then acts as a proxy, forwarding traffic from the PrivateLink endpoint to the database.
Place the DMS replication instance in the destination account, close to the target database. The primary bottleneck in a low-downtime migration is write latency to the target, not read speed from the source. Proximity to the target database minimizes write latency during CDC synchronization and reduces replication lag before cutover.
For MySQL-compatible source databases, binary logging must be enabled with binlog_format set to ROW, and the binary log retention period must be long enough to cover the full load window (typically 24 hours minimum). The DMS replication instance must also be appropriately sized for the dataset volume and source write rate. An undersized instance will create a throughput bottleneck during both full load and CDC phases.
NLB target groups require IP addresses, but RDS endpoints are DNS-based. In a Multi-AZ deployment, the IP address behind the RDS DNS endpoint can change during a failover event. If a failover occurs during migration, the NLB target group retains the old IP and the traffic path breaks. The recommended mitigation is to resolve the RDS DNS endpoint to its current IP before the migration window, register that IP in the NLB target group, schedule the migration during a low-traffic period, and configure CloudWatch alarms on RDS metrics to detect instability early.
The downtime depends entirely on how close to zero the replication lag is when cutover begins. In a well-executed migration using full load followed by CDC, the application downtime covers only the final cutover steps: enabling maintenance mode, setting the source to read-only, confirming zero lag, and switching the connection string. In the case described in this article, involving 100 GB of PII data migrated across AWS accounts using PrivateLink and DMS, total application downtime was 28 seconds.
AWS PrivateLink routes traffic privately within the AWS backbone infrastructure, ensuring it does not traverse the public internet. However, PrivateLink does not itself encrypt the payload. For database migrations involving sensitive data, TLS must be explicitly configured at the connection layer: SSL should be required on the RDS instance, and the DMS source and target endpoints should be configured to use SSL connections.


