

Build Smarter: Best Practices for Creating Optimized Dockerfile
08/07/2025
676
If you’ve been using Docker in your projects, you probably know how powerful it is for shipping consistent environments across teams and systems. It’s time to learn how to optimize dockerfile.
But here’s the thing: a poorly written Dockerfile can quickly become a hidden performance bottleneck. Making your images unnecessarily large, your build time painfully slow, or even causing unexpected behavior in production.
I’ve seen this firsthand—from early projects where we just “made it work” with whatever Dockerfile we had, to larger systems where the cost of a bad image multiplied across services.
My name is Bao. After working on several real-world projects and going through lots of trial and error. I’ve gathered a handful of practical best practices to optimize Dockerfile that I’d love to share with you. Whether you’re refining a production-grade image or just curious about what you might be missing. Let me walk you through how I approach Docker optimization. Hopefully it’ll save you time, headaches, and a few docker build rage moments 😅.
Identifying Inefficiencies in Dockerfile: A Case Study
Below is the Dockerfile we’ll analyze:
Key Observations:
1. Base Image:
- The Dockerfile uses ubuntu:latest, which is a general-purpose image. While versatile, it is significantly larger compared to minimal images like ubuntu:slim or Node.js-specific images like node:20-slim, node:20-alpine.
2. Redundant Package Installation:
- Tools like vim, wget, and git are installed but may not be necessary for building or running the application.
3. Global npm Packages:
- Pages like nodemon, ESLint, and prettier are installed globally. These are typically used for development and are not required in a production image.
4. Caching Issues:
- COPY . . is placed before npm install, invalidating the cache whenever any application file changes, even if the dependencies remain the same.
5. Shell Customization:
- Setting up a custom shell prompt (PS1) is irrelevant for production environments, adding unnecessary steps.
6. Development Tool in Production:
- The CMD uses nodemon, which is a development tool, to run the application
Optimized your Docker Image
Here’s how we can optimize the Dockerfile step by step. Showing the before and after for each section with the result to clearly distinguish the improvements.
1. Change the Base Image
Before:
FROM ubuntu:latest

RUN apt-get update && apt-get install -y curl &&
    curl -fsSL https://deb.nodesource.com/setup_20.x | bash - && \
apt-get install -y nodejs- Use ubuntu:latest, a general-purpose image that is large and includes many unnecessary tools.
After:
FROM node:20-alpine- Switches to node:20-alpine, a lightweight image specifically tailored for Node.js applications.
Result:

- With the first change being applied, the image size is drastically reduced by about ~200MB.
2. Simplify Installed Packages
Before:
RUN apt-get update && apt-get install -y \
    curl \
    wget \
    git \
    vim \
    python3 \
    make \
    g++ && \
    curl -fsSL https://deb.nodesource.com/setup_20.x | bash - && \
apt-get install -y nodejs- Installs multiple tools (curl, wget, vim, git) and Node.js manually, increasing the image size and complexity.
After:
RUN apk add --no-cache python3 make g++- Uses apk (Alpine’s package manager) to install only essential build tools (python3, make, g++).
Result:

- The image should be cleaner and smaller after removing the unnecessary tools, packages. (~250MB vs ~400MB with the older version)
3. Leverage Dependency Caching
Before:
COPY . .
RUN npm install- Copies all files before installing dependencies, causing cache invalidation whenever any file changes, even if dependencies remain unchanged.

After:
COPY package*.json ./
RUN npm install --only=production
COPY . .- Copies only package.json and package-lock.json first, ensuring that dependency installation is only re-run when these files change.
- Installs only production dependencies (–only=production) to exclude devDependencies.
Result:
- Faster rebuilds and a smaller image by excluding unnecessary files and dependencies.
4. Remove Global npm Installations
Before:
RUN npm install -g nodemon eslint pm2 typescript prettier- Installs global npm packages (nodemon, eslint, pm2, ect.) that are not needed in production, increasing image size.
After:
- Remove Entirely: Global tools are omitted because they are unnecessary in production.
Result:
- Reduced image size and eliminated unnecessary layers.
5. Use a Production-Ready CMD
Before:
CMD ["nodemon", "/app/bin/www"]- Uses nodemon, which is meant for development, not production.
Result:
- A streamlined and efficient startup command.
6. Remove Unnecessary Shell Customization
Before:
ENV PS1A="💻\[\e[33m\]\u\[\e[m\]@ubuntu-node\[\e[36m\][\[\e[m\]\[\e[36m\]\w\[\e[m\]\[\e[36m\]]\[\e[m\]: "
RUN echo 'PS1=$PS1A' >> ~/.bashrc- Sets and applies a custom shell prompt that has no practical use in production
After:
- Remove Entirely: Shell customization is unnecessary and is removed.
Result:
- Cleaner image with no redundant configurations or layers.
Final Optimized Dockerfile
FROM node:20-alpine

WORKDIR /app

RUN apk add --no-cache python3 make g++

COPY package*.json ./
RUN npm install --only=production

COPY . .

EXPOSE 3000

CMD ["node", "/app/bin/www"]
7. Leverage Multi-Stage Builds to Separate Build and Runtime
In many Node.js projects, you might need tools like TypeScript or linters during the build phase—but they’re unnecessary in the final production image. That’s where multi-stage builds come in handy.
Before:
- Everything—from installation to build to running—happens in a single image, meaning all build-time tools get carried into production.
After:
- You separate the “build” and “run” stages, keeping only what’s strictly needed at runtime.
Result:
- Smaller, cleaner production image
- Build-time dependencies are excluded
- Faster and safer deployments
Final Optimized Dockerfile
# Stage 1 - Builder
FROM node:20-alpine AS builder

WORKDIR /app

RUN apk add --no-cache python3 make g++

COPY package*.json ./
RUN npm install --only=production

COPY . .

# Stage 2 - Production
FROM node:20-alpine

WORKDIR /app

COPY --from=builder /app/node_modules ./node_modules
COPY --from=builder /app ./

EXPOSE 3000

CMD ["node", "/app/bin/www"]
Bonus. Don’t Forget .dockerignore
Just like .gitignore, the .dockerignore file excludes unnecessary files and folders from the Docker build context (like node_modules, .git, logs, environment files, etc.).
Recommended .dockerignore:
node_modules
.git
*.log
.env
Dockerfile.dev
tests/
Why it matters:
- Faster builds (Docker doesn’t copy irrelevant files)
- Smaller and cleaner images
- Lower risk of leaking sensitive or unnecessary files
Results of Optimization
1. Smaller Image Size:
- The switch to node:20-alpine and removal of unnecessary packages reduced the image size from 1.36GB, down to 862MB.

2. Faster Build Times:
- Leveraging caching for dependency installation speeds up rebuilds significantly.
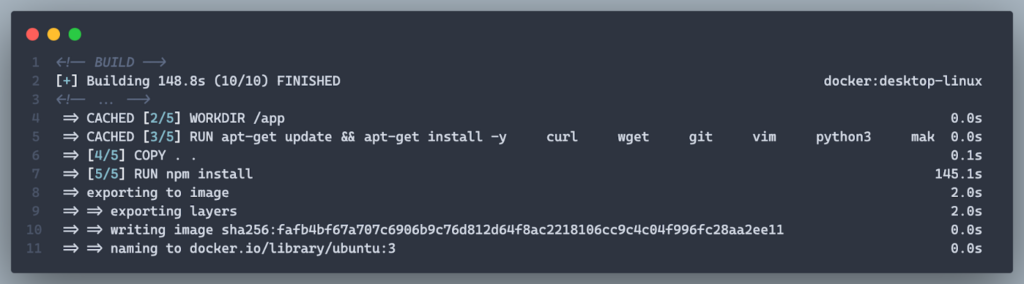
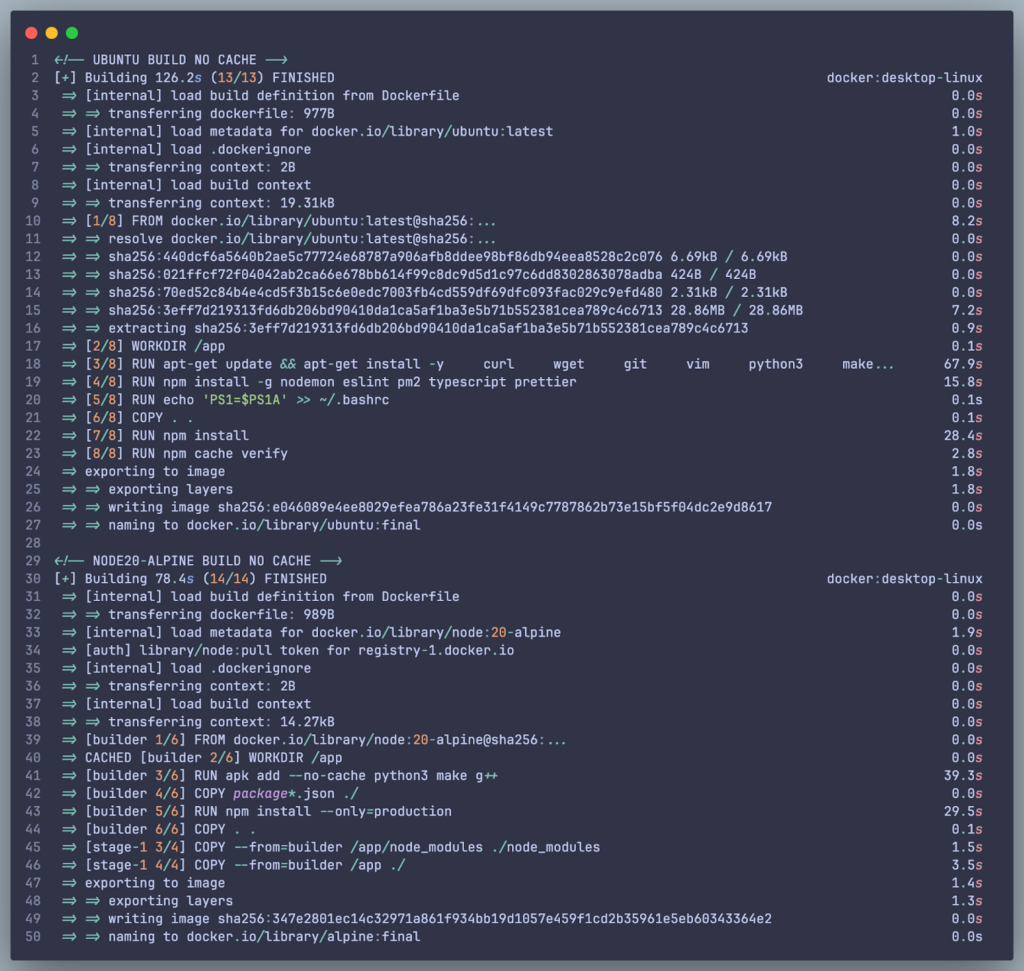
- Build No Cache:
- Ubuntu (Old Dockerfile): ~126.2s
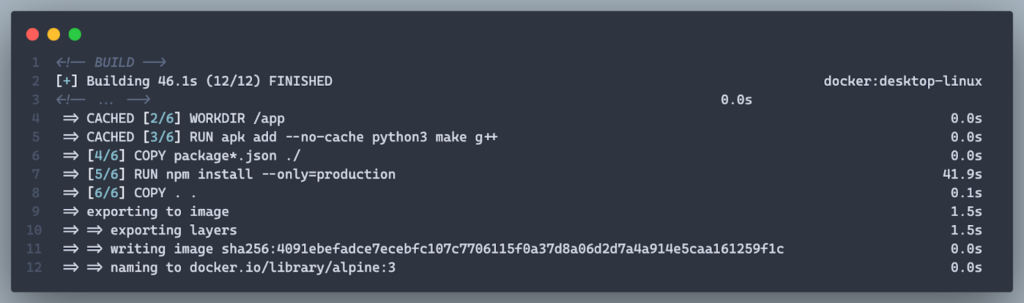
- Node 20 Alpine (New Dockerfile): 78.4s
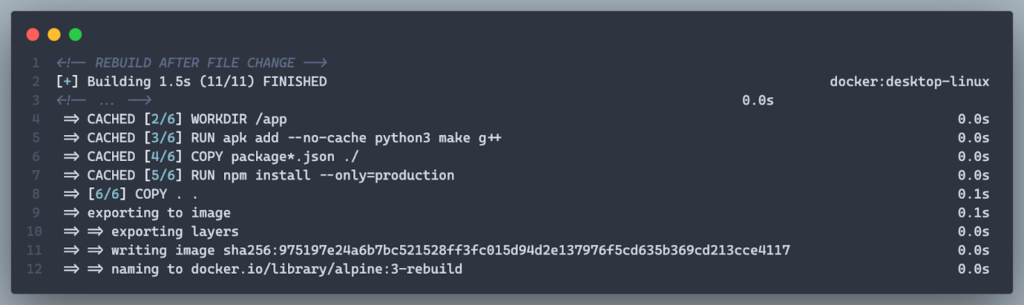
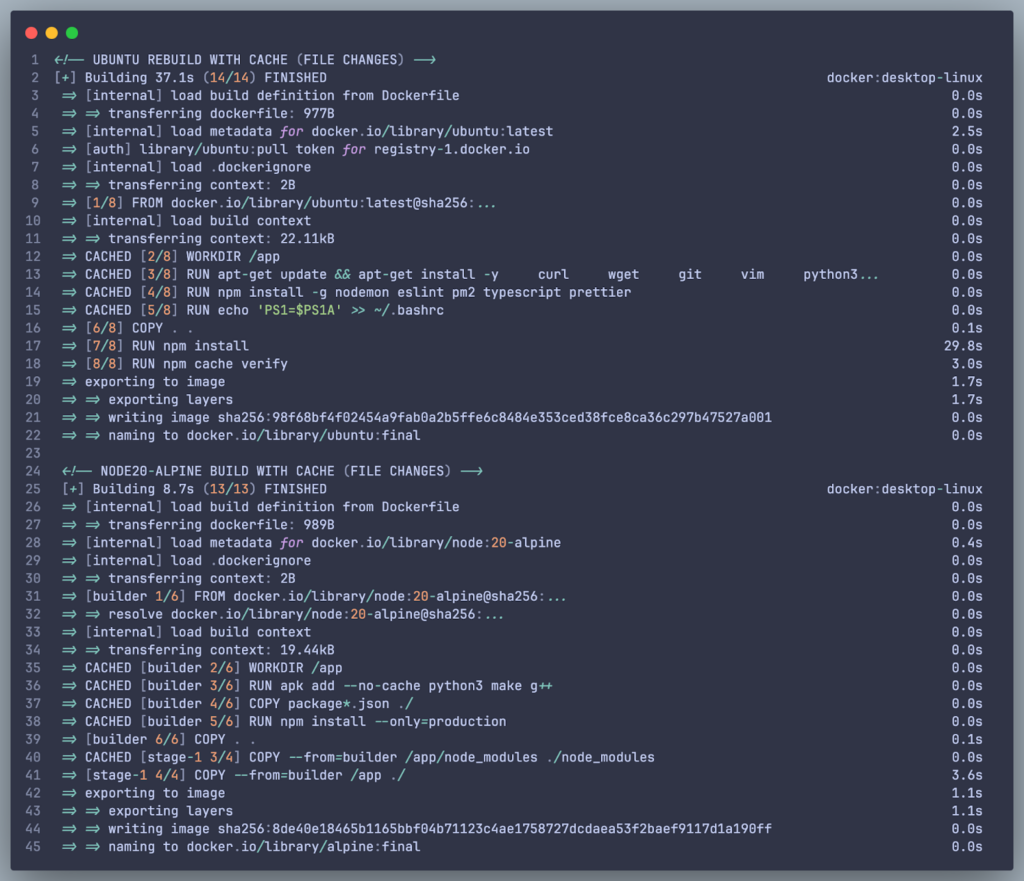
- Rebuild With Cache (After file changes):
- Ubuntu: 37.1s (Re-run:
npm install) - Node 20 Alpine: 8.7s (All Cached)
- Ubuntu: 37.1s (Re-run:
- Build No Cache:
3. Production-Ready Setup:
- The image now includes only essential build tools and runtime dependencies, making it secure and efficient for production.
By following these changes, your Dockerfile is now lighter, faster, and better suited for production environments. Let me know if you’d like further refinements!
Conclusion
Optimizing your Dockerfile is a crucial step in building smarter, faster, and more efficient containers. By adopting best practices: such as choosing the right base image, simplifying installed packages, leveraging caching, and using production-ready configurations, you can significantly enhance your build process and runtime performance.
In this article, we explored how small, deliberate changes—like switching to node:20-alpine, removing unnecessary tools, and refining dependency management—can lead to.