

08/04/2026
6
Insights, tips, and best practices on technologies and frameworks we use.

+2
FinOps for Retail Business? The Popular Finops Tools for Cloud Cost Management
08/04/2026
6

+1
How to Upgrade Aurora MySQL Databases: Lessons Learned from SupremeTech
21/03/2025
962
+2
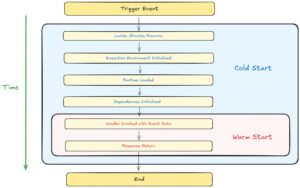
Best Practices for Building Reliable AWS Lambda Functions
13/01/2025
1.74k

+4
Pros and Cons of Using React Native in Web App Development
14/01/2024
4.21k

+3
Is Flutter Good for Web Development?
07/11/2023
1.32k

Editor’s Picks

+0
Rebuilding a Crowdfunding Platform: SupremeTech’s Approach to Drive Innovation and Growth
Published on 30/10/2025

+1
SupremeTech: Building the Future of Healthcare AI with Agentic AI
Published on 17/10/2025

+1
A Skill-Based Job Matching App
Published on 19/11/2024


Want to customize a software for your business?