

Knowledge
+0
Create Your First AWS Lambda Function (Node.js, Python, and Go)
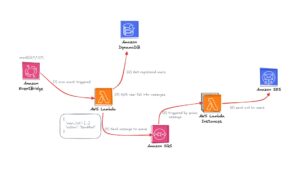
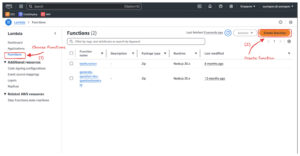
Welcome back to the “Mastering AWS Lambda with Bao” series! In the previous episode, we explored the fundamentals of AWS Lambda, including its concept, how it works, its benefits, and its real-world applications. In this SupremeTech blog episode, we’ll dive deeper into the example we discussed earlier. We’ll create an AWS Lambda function triggered by AWS EventBridge, fetch data from AWS DynamoDB, batch it into manageable chunks, and send it to Amazon SQS for further processing. We’ll implement this example in Node.js, Python, and Go to provide a comprehensive perspective. If you’re unfamiliar with these AWS services, don’t worry! I’ll guide you through it, like creating sample data for DynamoDB step-by-step, so you’ll have everything you need to follow along. By the end of this episode, you’ll have a fully functional AWS Lambda workflow triggered by EventBridge, interacts with DynamoDB to retrieve data, and pushes it to SQS. This will give you a clear demonstration of the power of serverless architecture. Let’s get started! >>> Maybe you are interested: Best Practices for Optimizing AWS Lambda Functions Prerequisites Before diving into how to create an AWS lambda function, make sure you have the following: AWS Account: Ensure you have access to create and manage AWS resources.Programming Environment: Install the following based on your preferred language:Node.jsPythonGolangIAM Role for Lambda Execution: Create an IAM role with the following permissions:AWSLambdaBasicExecutionRoleAmazonDynamoDBReadOnlyAccessAmazonSQSFullAccess Setting Up AWS Services We’ll configure the necessary AWS services (EventBridge, DynamoDB, and SQS) and permissions (IAM Role) to support the Lambda function. Using AWS Management Console: Step 1: Create an IAM Role Navigate to IAM Console:Open the IAM Console from the AWS Management Console.Create a Role:Click Roles in the left-hand menu, then click Create Role. Under Trusted Entity Type, select AWS Service, and then choose Lambda. Click Next to attach permissions. Attach Policies:Add the following managed policies to the role:AWSLambdaBasicExecutionRole: Allows Lambda to write logs to CloudWatch.AmazonDynamoDBReadOnlyAccess: Grants read access to the DynamoDB table.AmazonSQSFullAccess: Allows full access to send messages to and read from SQS queues. Review and Create:Give the role a name (we’ll use LambdaExecutionRole).Review the permissions and click Create Role. Copy the Role ARN:Once the role is created, copy its ARN (Amazon Resource Name) when creating the Lambda function. Step 2: Create a DynamoDB Table This table will store user data for the example Navigate to DynamoDB and click Create Table. Set the table name to UsersTable.Use userId (String) as the partition key. Leave other settings as default and click Create. Step 3: Add data sample to UsersTable (DynamoDB) Click on Explore items on the left-hand menu, then click Create item. Input sample data to create items, then click Create item to submit (Create at least 10 items for better experience). Step 4: Create an Amazon SQS Queue Go to Amazon SQS and click Create Queue. Name the queue UserProcessedQueue. Leave the defaults and click Create Queue. Create the AWS Lambda Function Now, we’ll create a Lambda function in AWS to fetch data from DynamoDB, validate it, batch it, and push it to SQS. Examples are provided for Node.js, Python, and Go. Lambda Function Logic: Fetch all users with emailEnabled = true from DynamoDB.Validate user data (e.g., ensure email exists and is valid).Batch users into groups of 5.Send each batch to SQS. Node.js Implementation Init & Install dependencies (if needed) (Sample code): npm init npm install aws-sdk Create a file named index.js with the below code: const AWS = require('aws-sdk'); const dynamoDB = new AWS.DynamoDB.DocumentClient(); const sqs = new AWS.SQS(); const emailRegex = /^[^\s@]+@[^\s@]+\.[^\s@]+$/; exports.handler = async () => { try { // Fetch data from DynamoDB let params = { TableName: "UsersTable", // Replace with your DynamoDB table name FilterExpression: "emailEnabled = :enabled", ExpressionAttributeValues: { ":enabled": true } }; let users = []; let data; do { data = await dynamoDB.scan(params).promise(); users = users.concat(data.Items); params.ExclusiveStartKey = data.LastEvaluatedKey; } while (params.ExclusiveStartKey); // Validate and batch data const batches = []; for (let i = 0; i < users.length; i += 100) { const batch = users.slice(i, i + 100).filter(user => user.email && emailRegex.test(user.email)); // Validate email if (batch.length > 0) { batches.push(batch); } } // Send batches to SQS for (const batch of batches) { const sqsParams = { QueueUrl: "https://sqs.ap-southeast-1.amazonaws.com/account-id/UserProcessedQueue", // Replace with your SQS URL MessageBody: JSON.stringify(batch) }; await sqs.sendMessage(sqsParams).promise(); } return { statusCode: 200, body: "Users batched and sent to SQS!" }; } catch (error) { console.error(error); return { statusCode: 500, body: "Error processing users." }; } }; Package the code into a zip file: zip -r function.zip . Python Implementation Init & Install dependencies (if needed) (Sample code): pip install boto3 -t . Create a file named index.js with the below code: import boto3 import json dynamodb = boto3.resource('dynamodb') table = dynamodb.Table('UsersTable') # Replace with your table name sqs = boto3.client('sqs') def lambda_handler(event, context): try: # Fetch data from DynamoDB response = table.scan( FilterExpression="emailEnabled = :enabled", ExpressionAttributeValues={":enabled": True} ) users = response['Items'] # Validate and batch data batches = [] for i in range(0, len(users), 100): batch = [user for user in users[i:i + 100] if 'email' in user] if batch: batches.append(batch) # Send batches to SQS for batch in batches: sqs.send_message( QueueUrl="https://sqs.ap-southeast-1.amazonaws.com/account-id/UserProcessedQueue", # Replace with your SQS URL MessageBody=json.dumps(batch) ) return {"statusCode": 200, "body": "Users batched and sent to SQS!"} except Exception as e: print(e) return {"statusCode": 500, "body": "Error processing users."} Package the code into a zip file: zip -r function.zip . Go Implementation Init & Install dependencies (if needed) (Sample Code): go mod init setup-aws-lambda go get github.com/aws/aws-lambda-go/lambda go get github.com/aws/aws-sdk-go/aws go get github.com/aws/aws-sdk-go/aws/sessiongo get github.com/aws/aws-sdk-go/service/dynamodbgo get github.com/aws/aws-sdk-go/service/sqs Create a file named main.go with the code below: package main import ( "context" "encoding/json" "log" "github.com/aws/aws-lambda-go/lambda" "github.com/aws/aws-sdk-go/aws" "github.com/aws/aws-sdk-go/aws/session" "github.com/aws/aws-sdk-go/service/dynamodb" "github.com/aws/aws-sdk-go/service/dynamodb/dynamodbattribute" "github.com/aws/aws-sdk-go/service/sqs" ) type User struct { UserId string `json:"userId"` Email string `json:"email"` EmailEnabled bool `json:"emailEnabled"` } func handler(ctx context.Context) (string, error) { sess := session.Must(session.NewSession()) dynamo := dynamodb.New(sess) sqsSvc := sqs.New(sess) // Fetch users from DynamoDB params := &dynamodb.ScanInput{ TableName: aws.String("UsersTable"), // Replace with your DynamoDB table name FilterExpression: aws.String("emailEnabled = :enabled"), ExpressionAttributeValues: map[string]*dynamodb.AttributeValue{ ":enabled": {BOOL: aws.Bool(true)}, }, } var users []User err := dynamo.ScanPages(params, func(page *dynamodb.ScanOutput, lastPage bool) bool { for _, item := range page.Items { var user User err := dynamodbattribute.UnmarshalMap(item, &user) if err == nil && user.Email != "" { users = append(users, user) } } return !lastPage }) if err != nil { return "", err } // Batch users and send to SQS for i := 0; i < len(users); i += 100 { end := i + 100 if end > len(users) { end = len(users) } batch := users[i:end] message, _ := json.Marshal(batch) _, err := sqsSvc.SendMessage(&sqs.SendMessageInput{ QueueUrl: aws.String("https://sqs.ap-southeast-1.amazonaws.com/account-id/UserProcessedQueue"), // Replace with your SQS URL MessageBody: aws.String(string(message)), }) if err != nil { log.Println(err) } } return "Users batched and sent to SQS!", nil } func main() { lambda.Start(handler) } Build the code into binary: GOOS=linux GOARCH=amd64 go build -o bootstrap main.go Package the binary: zip function.zip bootstrap Deploy to AWS Lambda Function Navigate to the Lambda Service and click the “Create function” button: Choose “Author from scratch” and provide the following details:Function name: Enter a unique name for your function (e.g., FetchUsersNode, FetchUsersPython, or FetchUsersGo).Runtime: Select the runtime that matches your code:Node.js: Choose Node.js 18.x or a compatible version (“node –version”). Python: Choose Python 3.9 or a compatible version (“python3 –version”).Go: Choose Amazon Linux 2023, architecture x86_64, and handler bootstrap (if available).Execution role:Choose "Use an existing role", and select the IAM role you created (e.g., LambdaExecutionRole). Click Create function to submit: A redirect will be performed, scroll down to the Code Source section and choose upload from .zip file: Click “Upload” and choose the destination .zip file to upload, then “Save”. Now we’ll attach the EventBridge rule by scrolling to the “Function overview” section and clicking the “Add trigger” button. Select the “Trigger configuration” to EventBridge (CloudWatch Events). Choose “Create a new rule” and add the schedule setting to the rule as below and Add: Test Our First Lambda Function Navigate to the Test tab in the Lambda function console.Create a new test event: Event name: Enter a name for the test (e.g., TestEvent). Click "Test" to run the function. Check the Execution results and the Logs section to verify the output: Check if the SQS has any message pushed in. At this point, we've successfully created our first Lambda functions on AWS. It's pretty simple. Just remember to delete any services after use to avoid incurring unnecessary costs! Conclusion In this episode, we practiced creating an AWS Lambda function that automatically triggers at midnight daily, fetches a list of users, and pushes the data to a queue. Through this example, we clearly understood how AWS Lambda operates and integrates with other AWS services like DynamoDB and SQS. However, this is just the beginning! There’s still so much more to explore about the world of AWS Lambda and serverless architecture. In the next episode, we’ll dive into “AWS Lambda Triggers and Events: How AWS Lambda Connects with the World”. Stay tuned for more exciting insights!
10/01/2025
807