


Level Up Your Code: Transitioning to Validated Environment Variables
09/07/2025
565
Validated Environment variables play a critical role in software projects of all sizes. As projects grow, so does the number of environment variables—API keys, custom configurations, feature flags, and more. Managing these variables effectively becomes increasingly complex. If mismanaged, they can lead to severe bugs, server crashes, and even security vulnerabilities.
While there’s no one-size-fits-all solution, having some structure in how we manage environment variables can really help reduce mistakes and confusion down the road. In this article, I’ll share how I’ve been handling them in my own projects and what’s worked well for me so far.
My Personal Story
When I first started programming, environment variables were a constant source of headaches. I often ran into problems like:
- Misspelled variable names.
- Failure to retrieve variable values, even though I was sure they were set.
- Forgetting to define variables entirely, leading to runtime errors.
These issues were tricky to detect. Typically, I wouldn’t notice anything was wrong until the application misbehaved or crashed. Debugging these errors was tedious—tracing back through the code to find that the root cause was a missing or misconfigured environment variable.
For a long time, I struggled with managing environment variables. Eventually, I discovered a more effective approach: validating all required variables before running the application. This process has saved me countless hours of debugging and has become a core part of my workflow. Today, I want to share this approach with you.
A Common Trap in Real Projects
Beyond personal hiccups, I’ve also seen issues arise in real-world projects due to manual environment handling. One particular pitfall involves relying on if/else conditions to set or interpret environment variables like NODE_ENV.
For example:
if (process.env.NODE_ENV === "production") {
  // do something
} else {
  // assume development
}
This type of conditional logic can seem harmless during development, but it often leads to incomplete coverage during testing. Developers typically test in development mode and may forget or assume things will “just work” in production. As a result, issues are only discovered after the application is deployed — when it’s too late.
In one of our team’s past projects, this exact scenario caused a production bug that slipped through all local tests. The root cause? A missing environment variable that was only required in production, and the conditional logic silently skipped it in development.
This highlights the importance of failing fast and loudly—ideally before the application even starts. And that’s exactly what environment variable validation helps with.
The Solution: Validating Environment Variables
The secret to managing environment variables efficiently lies in validation. Instead of assuming all necessary variables are correctly set, validate them at the application’s startup. This prevents the application from running in an incomplete or misconfigured state, minimizing runtime errors and improving overall reliability.
Benefits of Validating Environment Variables
- Error Prevention: Catch missing or misconfigured variables early.
- Improved Debugging: Clear error messages make it easier to trace issues.
- Security: Ensures sensitive variables like API keys are set correctly.
- Consistency: Establishes a standard for how environment variables are managed across your team.
Implementation
Here’s a simple and structured way to validate environment variables in a TypeScript project.
Step 1: Define an Interface
Define the expected environment variables using a TypeScript interface to enforce type safety.
export interface Config {
 NODE_ENV: "development" | "production" | "test";
 SLACK_SIGNING_SECRET: string;
 SLACK_BOT_TOKEN: string;
 SLACK_APP_TOKEN: string;
 PORT: number;
}
Step 2: Create a Config Loader
Write a function to load and validate environment variables. This loader ensures that each variable is present and meets the expected type or format.
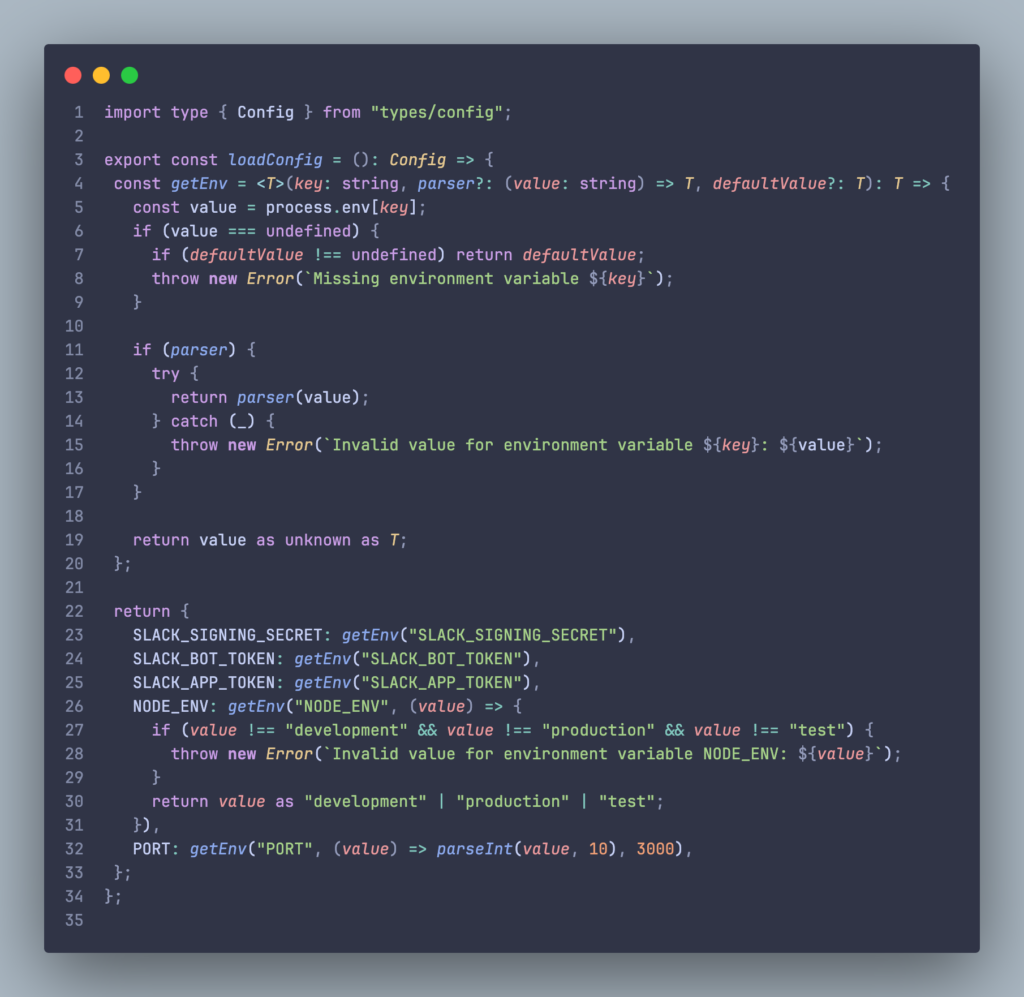
Step 3: Export the Configuration
Use the config loader to create a centralized configuration object that can be imported throughout your project.
import { loadConfig } from "./loader";

export const config = loadConfig();
Conclusion
Transitioning to validated environment variables is a straightforward yet powerful step toward building more reliable and secure applications. By validating variables during startup, you can catch misconfigurations early, save hours of debugging, and ensure your application is always running with the correct settings.