


How-to
Knowledge
Software Development
+0
How to Undo Commits Safely in Git: Git Reset and Git Revert Explained
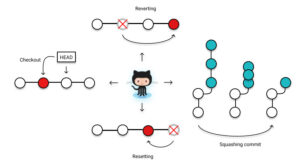
Introduction In software development, mistakes in commits happen more frequently than we would prefer. Imagine you are working on a feature branch and accidentally commit sensitive information, like an API key, or commit in the wrong branch. You quickly realize the need to undo these changes, but as you search for solutions, you come across two common commands: git reset and git revert. Each offers a way to return, but which is right for your situation? In this article, SupremeTech will explore both commands, how they work, when to use them, and how to decide which approach best addresses your specific needs. Three trees in Git Before getting started, it’s important to understand Git's internal state management systems, called “Git’s three-tree”: Working Directory: This is the workspace on your local machine, it reflects the current state of your files and any changes made that have not yet been staged or committed. You can see changes in the Working Directory with git status.Staging Index: This space holds a snapshot of changes ready to be committed. After you’ve made changes in the Working Directory, you can add them to the Staging Index with git add.Commit History: This is the timeline of saved changes in your project. When you use the git commit command, it takes the changes from the Staging Index and adds them to this history as a new commit. Figure 1. The Git’s three-tree The animation above demonstrates Git's three-tree structure by showing the creation of file1.js and committing it as C1. We add two more examples: file2.js as a C2 commit and file3.js as a C3 commit. These three commits will be used throughout the article as we explore git reset and git revert commands. Figure 2. Visualizing Git's three-tree with three commits Undoing commits with git reset The git reset command allows you to undo changes in your working directory by moving the branch tip back to a specific commit and discarding all commits made after that point. Figure 3. Visualizing the git reset command After running the command git reset HEAD~1, you’ll notice two changes: The branch tip has moved to the commit C2.The latest commit (C3) has been discarded from the commit history. The HEAD~1 is a way to reference the commit before the current HEAD. You can use similar syntax to go back further, like HEAD~2 to go back two commits from HEAD. Alternatively, you can specify a particular commit using its hash ID. The next question is where did the changes from C3 commit go? (the file3.js in this example). Did it delete permanently, or is it saved somewhere? This is where the git reset flags come into play. Bypassing one of the following flags, you can control the changes: --soft: It undoes the commits in the history and places the changes back in the Staging Index, ready to be committed again if needed. Figure 4. Visualizing git reset command with --soft flag -—mixed (this is the default option): It is similar to—-soft but also clears the Staging Index. This means any changes from the discarded commits are left unstaged in the Working Directory, requiring you to re-add them before re-committing. Figure 5. Visualizing git reset command with --mixed flag --hard: This option clears all changes from both the Staging Index and Working Directory and resets the codebase to match the specified commit without making any modifications. Figure 6. Visualizing git reset command with --hard flag By using git reset, you've successfully undone a specific commit. However, try to push these changes to the remote repository with a regular git push. You’ll get an error because the local commit history no longer matches the remote. To push these changes, you need to use a force push (git push --force). While this command will update the remote branch, it comes with risks - it can overwrite the remote history, creating potential issues for other developers. To avoid these problems, let’s explore a safer alternative: Undoing public commits with git revert The git revert command is an undo command, but it doesn’t work like the git reset. Instead of removing a commit from the project history, it creates a new one containing the inverse of the original changes. Figure 7. Visualizing the git revert command The result of running the command git revert HEAD is a new commit that undoes the changes made in the C3 commit. Since the C3 commit added file3.js, the revert will effectively delete this file. In short, running git revert HEAD will bring your code back to its state at the C2 commit. You can prevent git revert from automatically creating a new commit by using the -n or --no-commit flag. With this option, the inverse changes are placed in the Staging Index and Working Directory, allowing you to review or modify them before committing. Figure 8. Visualizing git revert command with --no-commit flag The git revert command allows you to go back to previous commits without removing any mistake commits. It doesn’t re-write the project history. Because of this, this command should be used to undo changes on a public branch. What is the difference between Git Reset vs. Git Revert? The difference between git reset and git revert is that git reset should be used to undo changes in your local history, while git revert should be recommended for undoing changes on a shared or public branch. Both git reset and git revert are commands for undoing changes, but they work differently in key ways: git resetgit revertHow it worksReverts to a previous state by removing the specified commit.Reverts to a previous state by creating a new commit with inverse changes.OptionsOffers --mixed, --soft, and --hard flags to control how changes are handled.Offers --no-commit to add inverse changes without automatically committing them.UsageRecommended for undoing changes in your local history.Recommended for undoing changes on a shared or public branch. Conclusion By now, you should clearly understand how to undo changes in a Git repository using git reset and git revert. In short, use git reset for local-only history changes, and use git revert to undo changes on a shared branch safely. Choosing the right command for your situation lets you keep your project history clean and ensures smoother collaboration with your teammates.
25/11/2024
655