Header image

Back/Forward Cache, Hiện Đại Hay Hại Điện?

19/12/2022

733

Mục Lục

  • Back/forward cache là gì?
  • Nhận biết một trang được lưu, khôi phục từ back/forward cache.
  • Tối ưu hóa cho back/forward cache bằng Chrome DevTools
  • Những tác động của back/forward cache đối với trang web

Đã bao giờ bạn gặp trường hợp giống thế này chưa?

Bạn đang làm một website bán hàng. Khi người dùng đang ở trang thanh toán và đã điền đầy đủ thông tin tài khoản ngân hàng, tiếp theo họ chuyển đến trang giỏ hàng để cập nhật, sau đấy họ lại điều hướng trở lại trang thanh toán. Trên một số thiết bị, trang thanh toán sẽ được tải lại với form chứa thông tin tài khoản thanh toán được làm mới, nhưng trên một số thiết bị khác thì không, khi người dùng nhấp vào nút quay lại của trình duyệt, trang web trước đó sẽ không mất thời gian để tải lại mà nó sẽ xuất hiện ngay lập tức với những thông tin nhạy cảm mà người dùng đã nhập. Trên các thiết bị này, trang web đã được khôi phục từ một loại bộ nhớ đệm của trình duyệt có tên gọi là Back/forward cache. Trong vài trường hợp, việc lưu trữ nội dung của một trang web, để giúp người dùng có thể điều hướng trở lại ngay lập tức, mà không mất thời gian để tải lại như lúc ban đầu là một tính năng rất hay, hữu ích. Nhưng trong một số trường hợp khác, đấy cũng có thể trở thành bug.

Back/forward cache là gì?

Back/forward cache ( gọi tắt là bfcache) là một loại bộ nhớ đệm, giúp tối ưu hóa trình duyệt cho phép điều hướng quay lại và chuyển tiếp ngay lập tức. Nó cải thiện đáng kể trải nghiệm duyệt web cho người dùng — đặc biệt là những người có mạng hoặc thiết bị chậm hơn vì nó giúp trình duyệt có thể tải lại trang web trước đó mà không cần phải tải lại tài nguyên.

Phát hiện một trang được khôi phục từ bfcache.

Sự kiện pageshow được kích hoạt ngay sau sự kiện load khi trang web đang tải lần đầu và bất kỳ lúc nào trang được khôi phục từ bfcache. Sự kiện pageshow có một thuộc tính là persisted, nó sẽ có giá trị là true nếu trang được khôi phục từ bfcache (và ngược lại là false nếu không). Vì vậy, bạn có thể sử dụng thuộc tính persisted này để phân biệt trang được tải thông thường với trang được khôi phục từ bfcache. Ví dụ:

window.addEventListener('pageshow', (event) => {
  if (event.persisted) {
    console.log('Trang web nay duoc khoi phuc tu bfcache.');
  } else {
    console.log('Trang web nay duoc tai xuong binh thuong.');
  }
});

Nhận biết một trang có thể được đưa vào bfcache

Ngược lại với sự kiện pageshow ta cũng có sự kiện pagehide. Sự kiện pagehide này sẽ được kích hoạt khi trang được tải xuống bình thường hoặc khi trình duyệt cố gắng đưa nó vào bộ nhớ đệm bfcache. Sự kiện pagehide này cũng có một thuộc tính là persisted. Nếu giá trị của nó là false thì bạn có thể chắc chắn rằng một trang sẽ không được đưa vào bfcache. Tuy nhiên, nếu giá trị của thuộc tính này là true, nó không đảm bảo rằng một trang chắc chắn sẽ được lưu vào bộ nhớ đệm đâu nhé. Nó chỉ mang ý nghĩa là trình duyệt dự định lưu trang đấy vào bộ nhớ bfcache mà thôi, nhưng có thể có các yếu tố khiến nó không thể làm như vậy.

window.addEventListener('pagehide', (event) => {
  if (event.persisted) {
    console.log('Trang web nay *co the* duoc dua vao bfcache.');
  } else {
    console.log('Trang web nay khong duoc dua vao bfcache.');
  }
});

Tối ưu hóa cho bfcache bằng Chrome DevTools

Bộ nhớ đệm bfcache đã có trên tất cả các trình duyệt web phổ biến hiện nay nhưng hiện chỉ có Chrome là có cung cấp cho chúng ta công cụ để kiểm tra mà thôi. Công cụ dành cho nhà phát triển của Chrome có thể giúp bạn kiểm tra các trang của mình để đảm bảo chúng được tối ưu hóa cho bfcache và xác định bất kỳ vấn đề nào có thể khiến chúng không đủ điều kiện.

Tối ưu hóa cho bfcache bằng Chrome DevTools

Để kiểm tra một trang cụ thể, hãy điều hướng đến trang đó trong Chrome và sau đó trong DevTools, đi tới Application > Back/forward cache. Tiếp theo, nhấp vào nút Run TestDevTools sẽ cố gắng điều hướng và quay lại để xác định xem trang có thể được khôi phục từ bfcache hay không.

Tối ưu hóa cho bfcache bằng Chrome DevTools

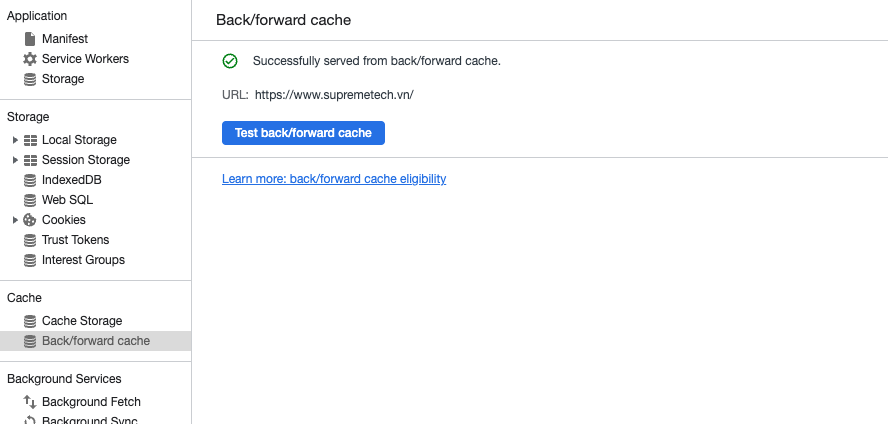
Nếu không thành công, bảng điều khiển sẽ cho biết trang không được khôi phục và liệt kê lý do tại sao. Nếu lý do là điều mà bạn với tư cách là nhà phát triển có thể giải quyết, thì lý do đó cũng sẽ được chỉ ra.

Cập nhật hoặc xóa dữ liệu sau khi trang web được khôi phục bfcache

Trở lại với vấn đề mà mình đặt ra ở đầu bài viết này. Nếu trang web của bạn lưu giữ trạng thái người dùng — đặc biệt là bất kỳ thông tin nhạy cảm nào của họ — thì dữ liệu đó cần được cập nhật hoặc xóa sau khi một trang được khôi phục từ bfcache.

Một ví dụ khác, thường gặp hơn là nếu người dùng đăng xuất khỏi trang web trên máy tính công cộng và người dùng tiếp theo nhấp vào nút quay lại. Điều này có thể làm lộ dữ liệu riêng tư mà người dùng cho rằng đã bị xóa sau khi họ đăng xuất. Để tránh những trường hợp như thế này, có một vài trick có thể ngăn trang được đưa vào bfcache nhưng vẫn sẽ có những ngoại lệ, vậy nên tốt hơn hết là bạn nên luôn cập nhật lại trang sau một sự kiện pageshow nếu như event.persisted có giá trị là true.

Đoạn mã sau sẽ kiểm tra sự hiện diện của cookie dành riêng cho trang web trong sự kiện pageshow và tải lại nếu không tìm thấy cookie:

window.addEventListener('pageshow', (event) => {
  if (event.persisted && !document.cookie.match(/my-cookie/)) {
    // Bat buoc tai lai trang neu nhu nuoi dung da dang xuat.
    location.reload();
  }
});

Thống kê lượt truy cập trang web có sử dụng bfcache

Như đã giới thiệu ở phần trên, nếu một trang web được khôi phục từ bfcache thì nó sẽ không tốn tài nguyên, dữ liệu mạng, điều đó cũng đồng nghĩa với việc trang web đó đã bị mất đi một lượt truy cập nếu bạn theo dõi lượt truy cập vào trang web của mình bằng các công cụ phân tích vì hầu hết các thư viện công cụ phân tích phổ biến không theo dõi khôi phục bfcache dưới dạng số lần xem trang mới. Vậy nên, nếu bạn không biết/lường được vấn đề này thì việc giảm lưu lượng truy cập, lượt xem do bfcache gây ra sẽ ít nhiều có ảnh hưởng không tốt đến việc xếp hạng trang web của bạn, mặc dù nó giúp tăng trải nghiệm của người dùng.

Nếu bạn không muốn số lần xem trang của mình giảm xuống do trình duyệt bật bfcache, bạn có thể báo cáo số lần khôi phục bfcache dưới dạng số lần xem trang (được khuyến nghị) bằng cách lắng nghe sự kiện pageshow và kiểm tra thuộc tính persisted.

Ví dụ sau đây cho thấy cách thực hiện việc này với Google Analytics ( logic cũng tương tự đối với các công cụ phân tích khác ) :

// Gui mot luot xem khi trang duoc tai lan dau tien.
gtag('event', 'page_view');

window.addEventListener('pageshow', (event) => {
  // Gui mot luot xem khi trang duoc khoi phuc tu bfcache.
  if (event.persisted) {
    gtag('event', 'page_view');
  }
});

Tổng kết

Cái gì cũng có giá trị của nó, cũng có tồn tại những ưu và nhược điểm, bfcache cũng không ngoại lệ. Việc quay lại một trang trước đó mà không phải tải lại từ đầu là một tính năng rất hữu ích, không chỉ giúp tăng tốc độ điều hướng mà còn giảm việc sử dụng dữ liệu, vì trình duyệt không cần phải tải lại tài nguyên. Điều này giúp tăng trải nghiệm của người dùng đáng kể nhưng nó cũng tiềm ẩn rủi ro về bảo mật dữ liệu cá nhân, làm giảm lượt truy cập trang trực tuyến và một số vấn đề khác nữa. Điều quan trọng là bản thân người lập trình viên phải biết và kiểm soát được nó trong từng trường hợp, vì nếu không, trong một số trường hợp, tính năng cũng có thể sẽ trở thành bug.

Bài viết này không chỉ dành cho các lập trình viên tham khảo mà ngay cả các tester cũng có thể đưa vào trong test case của mình đặc biệt là trong các trang web có yêu cầu yếu tố bảo mật hoặc những trang có dữ liệu thường xuyên thay đổi.

Hi vọng bài viết này của mình hữu ích đối với các bạn. Đừng quên share và gắn bookmark cho bài viết này để tiện xem lại sau này nhé 😉 !

Tài liệu tham khảo

Related Blog

What is middleware integration

Online-Merge-Offline Retail

Software Development

+0

    What is Middleware Integration for CDI? | Benefits and Examples

    In the last article, we've discussed Customer Data Integration (CDI) and its important role for OMO Retail. This article will continue to dig deeper into a common type of CDI. Middleware integration is a powerful and flexible solution for CDI, particularly suitable for complex, real-time, and scalable integration needs. Check out SupremeTech's success case studies in building a middleware for an online-merge-offline retail corporation in Japan. What is Middleware Integration? Middleware integration in CDI involves using middleware software to connect and facilitate the exchange of data between different systems, applications, and databases. Middleware acts as an intermediary layer. After successfully built, it ensures smooth communication and data flow without requiring direct connections between the integrated systems. It allows different systems to work together seamlessly. Features of Middleware Integration Connectivity: Middleware provides connectors and adapters to link various systems, regardless of their platforms or technologies. By using middleware, retail businesses do not need to waste time syncing the existing systems of different sales platforms. However, they can still make use of the synchronized database across sales channels to serve customers better. Data Transformation: Middleware can transform data formats and structures to ensure compatibility between different systems. Orchestration: Middleware solutions often include workflow and process orchestration capabilities to manage and automate complex data integration tasks. Scalability: Middleware can handle varying volumes of data and scale according to the business’s needs. We have used middleware to bridge the existing offline system and the online store of a retail giant in Japan with millions of customers. Security: Middleware ensures secure data exchange, protecting sensitive customer information during the integration process. Nowadays, data is considered the capital resource of a business. Securing customer data, therefore, is the utmost priority every business owner concerns. Monitoring and Management: Middleware typically offers tools for monitoring data flows, managing integrations, and troubleshooting issues. Examples of Middleware Solutions Apart from a custom middleware, there are several other handy tools when it comes to a bridge software. MuleSoft Anypoint Platform MuleSoft provides a comprehensive integration platform that enables the connection of any application, data, or device with APIs. It supports both on-premises and cloud integrations. Its main features include API management, data transformation, real-time analytics, and pre-built connectors for various systems. Dell Boomi Boomi offers a cloud-based integration platform as a service (iPaaS) that connects applications and automates workflows across hybrid IT environments. Dell Boomi's highlight features are drag-and-drop interface, pre-built connectors, real-time data synchronization, and extensive support for various protocols. Oracle Integration Cloud Oracle Integration Cloud offers a comprehensive solution for integrating applications and data across on-premises and cloud environments. It offers a wide range of features, including but not limited to pre-built adapters, process automation, visual development tools, and robust analytics. Microsoft Azure Logic Apps Azure Logic Apps is a cloud service that automates and orchestrates tasks and workflows by integrating applications, data, and services across organizations. The main functionalities of MS Azure include extensive integration capabilities, built-in connectors, scalability, and flexibility in designing workflows. Benefits of Middleware Integration Middleware integration offers many benefits for businesses. It ensures seamless communication between different systems and enhances operational efficiency. Middleware provides real-time data availability and supports various integration patterns and workflows. Thus, it is adaptable to evolving business needs. Moreover, it transforms data to ensure system compatibility. It also centralizes management, simplifying monitoring and troubleshooting. Additionally, it enhances security by protecting sensitive data during exchanges. Overall, middleware integration improves decision-making and customer experiences. If you need a custom middleware for your unique business, book a free consultation with us! Providing bridging solutions for online-merge-offline retail businesses is one of SupremeTech's best-selling services. Not only do we have abundant experiences but we also implement fast and cost-efficiently. Let us know your current problems and we will tackle them down together!

    15/07/2024

    78

    Online-Merge-Offline Retail

    +1

    • Software Development

    15/07/2024

    78

    What is Middleware Integration for CDI? | Benefits and Examples

    what is customer data integration and why it is important for omo retail

    Knowledge

    Online-Merge-Offline Retail

    +0

      What is Customer Data Integration (CDI) and why it is important for OMO retail?

      Hi business operators, having a unified view of customer base across various channels can make all the difference. By leveraging customer data integration, businesses can improve customer satisfaction, boost sales, and stay ahead in a rapidly evolving marketplace. This procedure is even more important for OMO retail because of the complexity of customer data the business needs to handle across online and offline sales channels. In this article, we will give answer to the question What is Customer Data Integration and its role for OMO retail. What is Customer Data Integration (CDI)? In short, customer data integration (CDI) involves consolidating information from in-store purchases, online transactions, social media interactions, and more into a single database. This streamlined approach not only enhances customer experiences by enabling personalized marketing and efficient service. It also provides valuable insights that drive strategic decision-making. Most Common Types of Customer Data Integration Customer Data Integration (CDI) can be categorized into several types based on the methods of integration, data sources, and the technology used. Here are some primary types of customer data integration: Batch Data Integration The first type involves collecting and processing data at scheduled intervals rather than in real-time. This method is commonly used for large volumes of data that do not require immediate processing. Data is extracted from various sources, transformed into a consistent format, and then loaded into a target database or data warehouse during off-peak hours to minimize system impact. This type is ideal for routine tasks such as nightly data backups, end-of-day transaction processing, and periodic data synchronization between systems. Key benefits of Batch Data Integration Efficient for processing large datasetsReduces load on systems during business hoursSimplifies data management by handling updates in bulk. Real-Time Data Integration The second type involves integrating data during generation, providing up-to-the-minute information. This method is essential for applications that require immediate data updates and insights. Data is captured and transmitted instantly from various sources to a central system using real-time processing technologies such as message queues, streaming platforms, or APIs. Real-time integration is crucial for applications like live customer support, fraud detection, personalized marketing, and dynamic pricing. Key benefits of Real-Time Data Integration Ensures timely and accurate data availabilityEnhances decision-making with current dataImproves customer experience by enabling immediate responses and interactions API-Based Data Integration The third type, API-based data integration, uses Application Programming Interfaces (APIs) to enable data sharing and integration between different systems and applications. This method supports both real-time and on-demand data exchanges. APIs allow applications to communicate and exchange data directly. Developers can create, manage, and consume APIs to facilitate seamless data flow between disparate systems. API-based integration is widely used for connecting cloud services, integrating third-party applications, enabling mobile apps to access backend data, and synchronizing data between enterprise systems. Key benefits of API-Based Data Integration Provides flexibility and scalabilitySupports real-time data accessSimplifies integration with various systems and platformsAllows for modular and maintainable integration solutions In general, each type of customer data integration has its own advantages and use cases, and organizations often use a combination of these methods to meet their specific needs and goals. Key components of Customer Data Integration (CDI) Data Collection In the early stage of business, customer data is fragmented and not well-synchronized across sales platforms. It's stored in the database of each sale channel and those channels operate independently. Therefore, the first component of CDI process is to gather the pieces of information. Customer data includes transaction records, social media interactions, customer service interactions, loyalty programs, website visits, and mobile app usage. Data Cleaning and Standardization Then, the second thing is ensuring that the data collected is accurate, complete, and consistent. This involves removing duplicates, correcting errors, filling in missing values, and standardizing data formats. Data Integration Data integration involves merging data from disparate sources into a unified database or data warehouse. This involves using data integration tools and technologies that can handle diverse data formats and large volumes of data. Data Storage and Enrichment Storing the integrated data in a centralized repository, such as a data warehouse or a customer relationship management (CRM) system, to facilitate easy access and analysis. Enhancing the integrated data by adding additional information, such as demographic details, psychographic data, and third-party data, to gain a more complete view of the customer. Data Analysis and Insights This component acts as the foundation of data-based decision making for business. From a huge amount of organized data, data readers can uncover patterns, trends, and insights about customer behavior, preferences, and needs. This can involve using analytics tools and techniques such as machine learning, data mining, and predictive analytics. Customer Segmentation Dividing the customer base into distinct segments based on characteristics such as demographics, purchasing behavior, and preferences. This enables more targeted marketing and personalized customer interactions. Why Customer Data Integration is crucial for Online-Merge-Offline business Customer Data Integration is particularly important for Online-Merge-Offline (OMO) retail because it helps to create a seamless and cohesive shopping experience. Here are key reasons why CDI is essential for OMO retail: Unified Customer Experience First and foremost, CDI ensures the consolidation of customer information from online and offline channels. Customers often switch between online and offline channels during their shopping journey. Regardless of that, they will experience the consistent care whether he is shopping in-store, online, or through a mobile app. CDI helps track these transitions seamlessly. Improved Inventory Management Secondly, CDI provides real-time insights into inventory levels across all channels, helping retailers manage stock more efficiently and meet customer demand promptly. Data-Driven Decision Making By integrating data from both online and offline sources, retailers can gain a holistic view of customer behavior and preferences, enabling better decision-making. Integrated data allows for the analysis of trends and patterns across all channels, informing strategies for marketing, product development, and sales. Conclusion In conclusion, Customer Data Integration (CDI) is a vital strategy for businesses seeking to optimize their operations, enhance customer experiences, and drive growth in today’s competitive market. For retailers, particularly those operating in the F&B sector and OMO environments, the importance of CDI cannot be overlooked. It not only ensures consistency and accuracy across multiple channels but also empowers businesses to respond swiftly to customer needs and market trends. Effective CDI enhances operational efficiency, optimizes inventory management, and supports the development of targeted marketing strategies. Ultimately, CDI leads to increased customer satisfaction and loyalty. Embracing CDI is not just about technology implementation; it’s about creating a customer-centric approach that aligns with the dynamic landscape of modern commerce. SupremeTech has experience in handling data integration for businesses with millions of customers. If you're looking for integration services for large-scale system, book a free consultation with us!

      11/07/2024

      113

      Knowledge

      +1

      • Online-Merge-Offline Retail

      11/07/2024

      113

      What is Customer Data Integration (CDI) and why it is important for OMO retail?

      what is react native tab view

      Knowledge

      Software Development

      +0

        An Overview of React Native Tab View

        Hi tech fellows, it's been a while since our last blog. June is usually among the busiest times of the year as we spent time reviewing and planning for the second half of the year. With all the exciting plans ahead, we hope the rest of 2024 will be both challenging and inspiring. We'll keep you posted in the upcoming articles. But for now, let's dive in the next blog series about React Native Tab View. An Overview of React Native Tab View What is React Native Tab View? React Native Tab View is a powerful component for creating tabbed interfaces in React Native applications. It provides a highly customizable and performant solution for adding tab navigation, which is a common requirement in mobile apps. Here's an overview of its key features and components. Key Features of React Native Tab View Smooth Transitions refers to the seamless and fluid animation that occurs when switching between different tabs. This feature offers smooth and customizable transitions between tabs, enhancing user experience. Customization provides highly customizable solutions with support for styling tabs and the tab bar, allowing developers to match the look and feel of their application. Swipeable Tabs allows users to swipe between tabs, which is a common and intuitive navigation pattern on mobile devices. Lazy Loading supports lazy loading of tab content, which can improve performance by only rendering the tab content when it becomes active. This feature is crucial for apps that prioritize high performance and loading speed. Integration with React Navigation can be easily integrated with React Navigation, providing a seamless navigation experience within the app. Accessibility includes all kinds of accessibility-support features. Key Components of React Native Tab View TabView: The main component that holds the tab navigator. It manages the state and renders the appropriate tab content based on the current index. TabBar: A customizable tab bar component that displays the tab labels and handles the user interaction for changing tabs. TabBarIndicator: A component that renders an indicator under the currently active tab, providing visual feedback to the user. SceneMap: A utility function for mapping routes to their corresponding components. It helps in defining the content for each tab. Basic Usage Example import * as React from 'react'; import { View, Text, StyleSheet } from 'react-native'; import { TabView, SceneMap } from 'react-native-tab-view'; const FirstRoute = () => ( <View style={[styles.scene, { backgroundColor: '#ff4081' }]}> <Text>First Tab</Text> </View> ); const SecondRoute = () => ( <View style={[styles.scene, { backgroundColor: '#673ab7' }]}> <Text>Second Tab</Text> </View> ); export default function TabViewExample() { const [index, setIndex] = React.useState(0); const [routes] = React.useState([ { key: 'first', title: 'First' }, { key: 'second', title: 'Second' }, ]); const renderScene = SceneMap({ first: FirstRoute, second: SecondRoute, }); return ( <TabView navigationState={{ index, routes }} renderScene={renderScene} onIndexChange={setIndex} initialLayout={{ width: Dimensions.get('window').width }} /> ); } const styles = StyleSheet.create({ scene: { flex: 1, justifyContent: 'center', alignItems: 'center', }, }); Customization Tab View can be customized extensively through props and styles. You can style the tab bar, change the indicator color, customize the transition animations, and more. Here are a few common customizations: Tab Bar Styling renderTabBar={props => ( <TabBar {...props} indicatorStyle={{ backgroundColor: 'blue' }} style={{ backgroundColor: 'white' }} labelStyle={{ color: 'black' }} /> )} Custom Transitions renderScene={SceneMap({ first: FirstRoute, second: SecondRoute, })} transitionSpec={{ duration: 250, easing: Easing.out(Easing.exp), timing: Animated.timing, }} Conclusion React Native Tab View is a versatile and efficient component for implementing tab navigation in mobile apps. Its flexibility, ease of integration, and support for various customizations make it a popular choice among React Native developers. Whether you need basic tab functionality or advanced features like lazy loading and custom transitions, it provides the tools to create a polished and user-friendly tabbed interface. Contact us if you want an optimized native apps for your company!

        10/07/2024

        74

        Knowledge

        +1

        • Software Development

        10/07/2024

        74

        An Overview of React Native Tab View

        integrate-iap-in-react-native

        How-to

        Software Development

        +0

          Integrating IAP with Other Features in React Native

          Following the series about React Native IAP (In-App Purchases), in this article we will discover how to integrate IAP with other features. Integrating In-App Purchases (IAP) with other features in a React Native application can enhance user engagement and maximize revenue. This article will explore how to combine IAP with other monetization methods, sync IAP data with backend services, and use IAP data to personalize user experiences. We'll provide examples and code snippets to illustrate these integrations. Let's explore other articles in this series. Implementing IAP (In-App Purchases) in a React Native App Best Practices for React Native IAP (In-App Purchases) Combining IAP with Other Monetization Methods To diversify revenue streams, you can combine IAP with other monetization methods like ads and affiliate marketing. Example: Combining IAP with Ads You can offer an ad-free experience through IAP while still generating revenue from users who prefer the free version with ads. Integrate Ad SDK: Use a library like react-native-google-mobile-ads to display ads. import { BannerAd, BannerAdSize, TestIds } from '@react-native-google-mobile-ads'; const AdComponent = () => ( <BannerAd unitId={TestIds.BANNER} size={BannerAdSize.FULL_BANNER} requestOptions={{ requestNonPersonalizedAdsOnly: true, }} /> ); 2. Offer Ad-Free Purchase: Create an in-app purchase for removing ads. const productIds = ['com.example.remove_ads']; const buyRemoveAds = async () => { try { await RNIap.requestPurchase(productIds[0]); } catch (err) { console.warn(err.code, err.message); } }; // Example button to trigger purchase <Button title="Remove Ads" onPress={buyRemoveAds} />; 3. Conditional Rendering: Check if the user has purchased the ad-free version and conditionally render ads. const [adsRemoved, setAdsRemoved] = useState(false); useEffect(() => { const checkPurchase = async () => { const purchases = await RNIap.getAvailablePurchases(); setAdsRemoved(purchases.some(purchase => purchase.productId === productIds[0])); }; checkPurchase(); }, []); return ( <View> {!adsRemoved && <AdComponent />} {/* Other app components */} </View> ); Syncing IAP Data with Backend Services Syncing IAP data with a backend service helps maintain user purchase records, validate transactions, and provide a seamless experience across devices. Backend Setup: Create a simple backend to handle receipt validation and store purchase data. Here’s an example using Node.js and Express: const express = require('express'); const bodyParser = require('body-parser'); const app = express(); app.use(bodyParser.json()); app.post('/validate-receipt', async (req, res) => { const { receipt } = req.body; // Validate receipt with Apple/Google servers const isValid = await validateReceiptWithStore(receipt); if (isValid) { // Store purchase data in database await storePurchaseData(receipt); res.json({ success: true }); } else { res.json({ success: false }); } }); const validateReceiptWithStore = async (receipt) => { // Placeholder for actual validation logic return true; }; const storePurchaseData = async (receipt) => { // Placeholder for storing data logic }; app.listen(3000, () => console.log('Server running on port 3000')); 2. Client-Side Validation: Send the receipt to your backend for validation after a purchase. const validateReceipt = async (receipt) => { try { const response = await fetch('https://your-server.com/validate-receipt', { method: 'POST', headers: { 'Content-Type': 'application/json', }, body: JSON.stringify({ receipt }), }); const result = await response.json(); return result.success; } catch (error) { console.warn('Validation error', error); return false; } }; useEffect(() => { const purchaseUpdateSubscription = RNIap.purchaseUpdatedListener(async (purchase) => { const receipt = purchase.transactionReceipt; if (receipt) { const isValid = await validateReceipt(receipt); if (isValid) { // Complete the purchase await RNIap.finishTransaction(purchase, false); } } }); return () => { purchaseUpdateSubscription.remove(); }; }, []); Using IAP Data for Personalized User Experiences IAP data can be leveraged to personalize the user experience, making the app more engaging and tailored to individual preferences. Unlocking Features: Use IAP to unlock premium features. const [premiumUser, setPremiumUser] = useState(false); useEffect(() => { const checkPurchase = async () => { const purchases = await RNIap.getAvailablePurchases(); setPremiumUser(purchases.some(purchase => purchase.productId === 'com.example.premium')); }; checkPurchase(); }, []); return ( <View> {premiumUser ? ( <PremiumContent /> ) : ( <RegularContent /> )} </View> ); 2. Personalized Offers: Provide special offers based on past purchase behavior. const [specialOffer, setSpecialOffer] = useState(null); useEffect(() => { const fetchSpecialOffer = async () => { const purchases = await RNIap.getAvailablePurchases(); if (purchases.length > 0) { // Fetch special offer from backend based on purchase history const response = await fetch('https://your-server.com/special-offer', { method: 'POST', headers: { 'Content-Type': 'application/json', }, body: JSON.stringify({ userId: user.id }), }); const offer = await response.json(); setSpecialOffer(offer); } }; fetchSpecialOffer(); }, []); return ( <View> {specialOffer && <Text>{specialOffer.description}</Text>} </View> ); Conclusion Integrating IAP with other features in a React Native app can greatly enhance user engagement and revenue. By combining IAP with ads, syncing purchase data with backend services, and using IAP data for personalization, you create a more dynamic and user-friendly experience. Following these practices ensures that your app not only generates revenue but also provides value to your users, leading to higher satisfaction and retention.

          04/06/2024

          202

          How-to

          +1

          • Software Development

          04/06/2024

          202

          Integrating IAP with Other Features in React Native

          Customize software background

          Want to customize a software for your business?

          Meet with us! Schedule a meeting with us!