Header image

Mini Apps – Ứng Dụng Công Nghệ Là Chìa Khoá Thành Công Với Doanh Nghiệp Của Bạn (Part 2)

20/05/2022

658

line

Giới thiệu

Ở bài viết trước, chúng ta đã hiểu được Line Mini App là gì, cũng như những ví dụ minh họa cơ bản về những trường hợp nên sử dụng Mini App trên Line. Trong khuôn khổ bài viết này, chúng ta sẽ làm quen với việc tạo một ứng dụng Line Mini App và tích hợp nó vào trong Line.

Trước khi bắt đầu tạo một ứng dụng Line Mini App sẽ cần phải xác định trước những yêu cầu của nền tảng mà bạn đang tính xây dựng, thông thường sẽ liên quan tới luật và chính sách của quốc gia sở tại, vậy nên bạn nên đọc kỹ phần chính sách và điều khoản để đáp ứng được các yêu cầu. Đối với Line, yêu cầu đó có thể bao gồm: thông tin khách hàng, thông tin doanh nghiệp, nội dung chia sẻ và vấn đề liên quan tới bản quyền, … và lưu ý quan trọng, trong quá trình phát triển ứng dụng bạn có thể hoạt động tự do. Tuy nhiên, để ứng dụng được Publish, bạn cần được review và chấp nhận từ công ty Line.

Để tìm hiểu kỹ hơn về điều khoản và chính sách liên quan tới Line Mini App, bạn có thể xem bảng chi tiết tại đây. Lưu ý, với mỗi quốc gia sẽ có chính sách riêng biệt hãy xem kỹ nội dung theo quốc gia bạn đang hướng tới để áp dụng phù hợp với giải pháp định chọn.

Sau khi đã xác định và hiểu rõ, bạn có thể bắt đầu tiến hành tạo một ứng dụng Line Mini App theo các bước trong mục tiếp theo.

Tạo ứng dụng Line Mini App

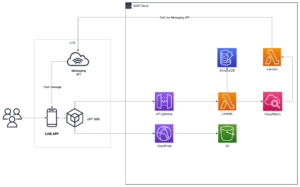
Để bắt đầu với một ứng dụng, giả sử chúng ta đang xây dựng ứng dụng Line Mini App là một ứng dụng chuyên tích điểm dành cho khách hàng thường xuyên check-in tại cửa hàng, và khi khách hàng đạt ngưỡng một số điểm nhất định, chúng ta sẽ gửi thông báo tới khách hàng và tặng khách hàng mã Voucher giảm giá sản phẩm, với yêu cầu đơn giản này, chúng ta hãy cùng xem ứng dụng mini app có thực sự tiện lợi không nhé.

Dưới đây, là các bước cần chuẩn bị trước khi tạo ứng dụng Mini App.

Chuẩn bị tài khoản Line

  • Việc đầu tiên, bạn cần truy cập tới trang quản trị dành cho nhà phát triển ứng dụng (nhấn tại đây).
Chuẩn bị tài khoản Line

Bạn có thể đăng nhập với tài khoản Line hoặc tài khoản doanh nghiệp trên Line, để tìm hiểu kỹ hơn về tài khoản doanh nghiệp, hãy tham khảo tại đây.

  • Sau khi đã đăng nhập thành công, màn hình quản trị sẽ hiển thị như dưới, bạn cần tạo 1 Provider để thử nghiệm, nhấn vào nút Create
create line
  • Điền tên Provider, ở đây chúng ta đặt tên Test-Mini-App, sau đó nhấn Create
create a new provider
  • Sau khi quá trình tạo Provider hoàn tất, bạn được chuyển tới màn hình mới, với 3 Tabs chính:
  • Channels: đây là tất cả các kênh mà nền tảng Line hỗ trợ để bạn có thể xây dựng các dịch vụ, trong khuôn khổ bài viết này, chúng ta chỉ cần quan tâm tới 2 channel là Line Login ChannelLine Messaging API Channel
  • Roles: đây là nơi bạn có thể thêm thành viên, nhà phát triển và người kiểm thử (Tester) để có quyền kết nối tới các channel bạn đã tạo.
  • Settings: là những cài đặt cơ bản quan tới Provider.
test mini app

Lựa chọn giữa LIFF hoặc Line Mini App

Sau khi khởi tạo tài khoản và tạo Provider ở bước trên, ở bước này chúng ta có thể tiến hành khởi tạo Line Mini App channel để bắt đầu, tuy nhiên, để có thể tạo được 1 Line Mini App channel, bạn sẽ qua bước kiểm tra và xác nhận từ LINE. Việc này sẽ tốn thời gian, vậy nên trong khuôn khổ bài viết này, chúng ta sẽ cùng tìm hiểu tới LIFF (LINE Front-end Framework), là nền tảng tương tự như Line Mini App và không cần phải chờ đợi review từ LINE.

Trước hết, chúng ta sẽ xem qua những điểm khác biệt giữa LIFF và Line Mini App

Điểm chung:

  • Cả 2 đều chạy trên nền tảng Web và chạy bởi trình duyệt LIFF, được nhúng vào trong ứng dụng Line.
  • Cả 2 đều có thể tích hợp nhiều công nghệ web mới nhất để cung cấp nhanh dịch vụ.

Điểm riêng:

LIFF appLINE MINI App
Môi trường– Chạy trên ứng dụng LINE.
– Chạy được trên hầu hết các trình duyệt phổ biến.
– Chỉ chạy được duy nhất trên ứng dụng LINE (điện thoại)
LINE review và chấp nhậnKhông cần, bạn có thể phát hành bất cứ lúc nào.– Phải được review và chấp nhận bởi LINE.
– Sau khi thỏa mãn điều kiện review, ứng dụng Line Mini App sẽ được xuất hiện bằng chức năng tìm kiếm và tại tab Home của ứng dụng LINE.
Service message chat roomKhông có sẵnBạn có thể sử dụng, chức năng có sẵn trên toàn bộ ứng dụng Line Mini Apps.

Tham khảo: tại đây

Trong khuôn khổ seri này, chúng ta sẽ lựa chọn LIFF app, là phương án nhanh nhất để bắt đầu, sau khi phát triển hoàn tất, chúng ta có thể tiến hành chuyển đổi sang Line Mini App channel. Tiếp theo, hãy tạo 2 channels như đã đề cập bên trên, bao gồm:

  • Line Login channel: hãy để mọi thông tin là mặc định, lưu ý vài điểm sau.
  • Region: chọn Japan
  • Company or owner’s country or region: Japan
  • Channel name: DEV-Login channel
  • Channel description: Line Mini App
  • App Type: chọn Web
  • Messaging API channel: hãy để mọi thông tin là mặc định, lưu ý vài điểm sau.
  • Company or owner’s country or region: Japan
  • Channel name: DEV-Messaging API
  • Channel description: Line Mini App
  • Category: Local Business and E-commerce
  • Subcategory: Shopping & retail
test mini app 2

Như vậy, là xong phần chuẩn bị cơ bản liên quan tới quản trị trên nền tảng Line, bạn sẽ cần chuẩn bị thêm về tài liệu để khởi tạo một ứng dụng mini app trên Line, hãy cùng tìm hiểu về LIFF (LINE Front-end Framework), một nền tảng chạy trên web app được cung cấp bởi LINE.

Khởi tạo LIFF apps.

Ở bước bên trên, chúng ta đã khởi tạo thành công 1 Provider có chứa sẵn 2 Channels là Login channelMessaging API channel, ở bước này chúng ta sẽ tiến hành khởi tạo 1 LIFF app và cấu hình LIFF app có thể tương tác với 2 channel này nhé.

Line Mini App là ứng dụng chạy trên nền tảng web và nó chạy trên LINE.

LIFF app (LINE Front-end Framework) là một framework dùng để xây dựng 1 ứng dụng web, được cung cấp bởi LINE, sử dụng LIFF, bạn sẽ giảm rất nhiều thời gian để xây dựng, xử lý, vì mọi thứ đã được LINE định nghĩa và cung cấp bên trong LIFF. Phiên bản mới nhất hiện tại của LIFF là version 2 (LINE Front-end Framework v2)

Bạn có thể sử dụng tính năng thử nghiệm (playground) với LIFF playground để dễ hình dung hơn các tính năng của LIFF.

Bước 01: Truy cập vào Login channel và tạo 1 LIFF app.

Bước 01: Truy cập vào Login channel và tạo 1 LIFF app.

Bước 02: Nhập thông tin, ví dụ như bên dưới

Tên trườngMô tảGiá trị
LIFF app nameTên của ứng dụng.demo-app
SizeLà kích thước của LIFF brower khi bật lênFull
Endpoint URLLà tên miền của ứng dụng, chúng ta sẽ cập nhật lại sauhttps://localhost.com:3000
Scopeskhai báo quyền cần cấp để xin dữ liệu khi chứng thực với LINEprofile, openid
Bot link featureoff
Scan QRon
Module modeoff

Bước 03: Sau khi đã điền đủ thông tin, nhấn vào nút Add, và quá trình tạo 1 LIFF app đã hoàn tất.

Bước 03: Sau khi đã điền đủ thông tin, nhấn vào nút Add, và quá trình tạo 1 LIFF app đã hoàn tất.

Kết thúc

Như vậy, với những bước trên, bạn đã hoàn thành được việc đăng ký tài khoản LINE, khởi tạo 1 ứng dụng LIFF trên LINE console.

Bài tiếp theo, chúng ta sẽ sang một seri mới liên quan tới kỹ thuật, đó là làm thế nào để triển khai ứng dụng LIFF và chạy nó trên nền tảng LINE.

Author: Kiet Vo

Related Blog

What is middleware integration

Online-Merge-Offline Retail

Software Development

+0

    What is Middleware Integration for CDI? | Benefits and Examples

    In the last article, we've discussed Customer Data Integration (CDI) and its important role for OMO Retail. This article will continue to dig deeper into a common type of CDI. Middleware integration is a powerful and flexible solution for CDI, particularly suitable for complex, real-time, and scalable integration needs. Check out SupremeTech's success case studies in building a middleware for an online-merge-offline retail corporation in Japan. What is Middleware Integration? Middleware integration in CDI involves using middleware software to connect and facilitate the exchange of data between different systems, applications, and databases. Middleware acts as an intermediary layer. After successfully built, it ensures smooth communication and data flow without requiring direct connections between the integrated systems. It allows different systems to work together seamlessly. Features of Middleware Integration Connectivity: Middleware provides connectors and adapters to link various systems, regardless of their platforms or technologies. By using middleware, retail businesses do not need to waste time syncing the existing systems of different sales platforms. However, they can still make use of the synchronized database across sales channels to serve customers better. Data Transformation: Middleware can transform data formats and structures to ensure compatibility between different systems. Orchestration: Middleware solutions often include workflow and process orchestration capabilities to manage and automate complex data integration tasks. Scalability: Middleware can handle varying volumes of data and scale according to the business’s needs. We have used middleware to bridge the existing offline system and the online store of a retail giant in Japan with millions of customers. Security: Middleware ensures secure data exchange, protecting sensitive customer information during the integration process. Nowadays, data is considered the capital resource of a business. Securing customer data, therefore, is the utmost priority every business owner concerns. Monitoring and Management: Middleware typically offers tools for monitoring data flows, managing integrations, and troubleshooting issues. Examples of Middleware Solutions Apart from a custom middleware, there are several other handy tools when it comes to a bridge software. MuleSoft Anypoint Platform MuleSoft provides a comprehensive integration platform that enables the connection of any application, data, or device with APIs. It supports both on-premises and cloud integrations. Its main features include API management, data transformation, real-time analytics, and pre-built connectors for various systems. Dell Boomi Boomi offers a cloud-based integration platform as a service (iPaaS) that connects applications and automates workflows across hybrid IT environments. Dell Boomi's highlight features are drag-and-drop interface, pre-built connectors, real-time data synchronization, and extensive support for various protocols. Oracle Integration Cloud Oracle Integration Cloud offers a comprehensive solution for integrating applications and data across on-premises and cloud environments. It offers a wide range of features, including but not limited to pre-built adapters, process automation, visual development tools, and robust analytics. Microsoft Azure Logic Apps Azure Logic Apps is a cloud service that automates and orchestrates tasks and workflows by integrating applications, data, and services across organizations. The main functionalities of MS Azure include extensive integration capabilities, built-in connectors, scalability, and flexibility in designing workflows. Benefits of Middleware Integration Middleware integration offers many benefits for businesses. It ensures seamless communication between different systems and enhances operational efficiency. Middleware provides real-time data availability and supports various integration patterns and workflows. Thus, it is adaptable to evolving business needs. Moreover, it transforms data to ensure system compatibility. It also centralizes management, simplifying monitoring and troubleshooting. Additionally, it enhances security by protecting sensitive data during exchanges. Overall, middleware integration improves decision-making and customer experiences. If you need a custom middleware for your unique business, book a free consultation with us! Providing bridging solutions for online-merge-offline retail businesses is one of SupremeTech's best-selling services. Not only do we have abundant experiences but we also implement fast and cost-efficiently. Let us know your current problems and we will tackle them down together!

    15/07/2024

    78

    Online-Merge-Offline Retail

    +1

    • Software Development

    15/07/2024

    78

    What is Middleware Integration for CDI? | Benefits and Examples

    what is customer data integration and why it is important for omo retail

    Knowledge

    Online-Merge-Offline Retail

    +0

      What is Customer Data Integration (CDI) and why it is important for OMO retail?

      Hi business operators, having a unified view of customer base across various channels can make all the difference. By leveraging customer data integration, businesses can improve customer satisfaction, boost sales, and stay ahead in a rapidly evolving marketplace. This procedure is even more important for OMO retail because of the complexity of customer data the business needs to handle across online and offline sales channels. In this article, we will give answer to the question What is Customer Data Integration and its role for OMO retail. What is Customer Data Integration (CDI)? In short, customer data integration (CDI) involves consolidating information from in-store purchases, online transactions, social media interactions, and more into a single database. This streamlined approach not only enhances customer experiences by enabling personalized marketing and efficient service. It also provides valuable insights that drive strategic decision-making. Most Common Types of Customer Data Integration Customer Data Integration (CDI) can be categorized into several types based on the methods of integration, data sources, and the technology used. Here are some primary types of customer data integration: Batch Data Integration The first type involves collecting and processing data at scheduled intervals rather than in real-time. This method is commonly used for large volumes of data that do not require immediate processing. Data is extracted from various sources, transformed into a consistent format, and then loaded into a target database or data warehouse during off-peak hours to minimize system impact. This type is ideal for routine tasks such as nightly data backups, end-of-day transaction processing, and periodic data synchronization between systems. Key benefits of Batch Data Integration Efficient for processing large datasetsReduces load on systems during business hoursSimplifies data management by handling updates in bulk. Real-Time Data Integration The second type involves integrating data during generation, providing up-to-the-minute information. This method is essential for applications that require immediate data updates and insights. Data is captured and transmitted instantly from various sources to a central system using real-time processing technologies such as message queues, streaming platforms, or APIs. Real-time integration is crucial for applications like live customer support, fraud detection, personalized marketing, and dynamic pricing. Key benefits of Real-Time Data Integration Ensures timely and accurate data availabilityEnhances decision-making with current dataImproves customer experience by enabling immediate responses and interactions API-Based Data Integration The third type, API-based data integration, uses Application Programming Interfaces (APIs) to enable data sharing and integration between different systems and applications. This method supports both real-time and on-demand data exchanges. APIs allow applications to communicate and exchange data directly. Developers can create, manage, and consume APIs to facilitate seamless data flow between disparate systems. API-based integration is widely used for connecting cloud services, integrating third-party applications, enabling mobile apps to access backend data, and synchronizing data between enterprise systems. Key benefits of API-Based Data Integration Provides flexibility and scalabilitySupports real-time data accessSimplifies integration with various systems and platformsAllows for modular and maintainable integration solutions In general, each type of customer data integration has its own advantages and use cases, and organizations often use a combination of these methods to meet their specific needs and goals. Key components of Customer Data Integration (CDI) Data Collection In the early stage of business, customer data is fragmented and not well-synchronized across sales platforms. It's stored in the database of each sale channel and those channels operate independently. Therefore, the first component of CDI process is to gather the pieces of information. Customer data includes transaction records, social media interactions, customer service interactions, loyalty programs, website visits, and mobile app usage. Data Cleaning and Standardization Then, the second thing is ensuring that the data collected is accurate, complete, and consistent. This involves removing duplicates, correcting errors, filling in missing values, and standardizing data formats. Data Integration Data integration involves merging data from disparate sources into a unified database or data warehouse. This involves using data integration tools and technologies that can handle diverse data formats and large volumes of data. Data Storage and Enrichment Storing the integrated data in a centralized repository, such as a data warehouse or a customer relationship management (CRM) system, to facilitate easy access and analysis. Enhancing the integrated data by adding additional information, such as demographic details, psychographic data, and third-party data, to gain a more complete view of the customer. Data Analysis and Insights This component acts as the foundation of data-based decision making for business. From a huge amount of organized data, data readers can uncover patterns, trends, and insights about customer behavior, preferences, and needs. This can involve using analytics tools and techniques such as machine learning, data mining, and predictive analytics. Customer Segmentation Dividing the customer base into distinct segments based on characteristics such as demographics, purchasing behavior, and preferences. This enables more targeted marketing and personalized customer interactions. Why Customer Data Integration is crucial for Online-Merge-Offline business Customer Data Integration is particularly important for Online-Merge-Offline (OMO) retail because it helps to create a seamless and cohesive shopping experience. Here are key reasons why CDI is essential for OMO retail: Unified Customer Experience First and foremost, CDI ensures the consolidation of customer information from online and offline channels. Customers often switch between online and offline channels during their shopping journey. Regardless of that, they will experience the consistent care whether he is shopping in-store, online, or through a mobile app. CDI helps track these transitions seamlessly. Improved Inventory Management Secondly, CDI provides real-time insights into inventory levels across all channels, helping retailers manage stock more efficiently and meet customer demand promptly. Data-Driven Decision Making By integrating data from both online and offline sources, retailers can gain a holistic view of customer behavior and preferences, enabling better decision-making. Integrated data allows for the analysis of trends and patterns across all channels, informing strategies for marketing, product development, and sales. Conclusion In conclusion, Customer Data Integration (CDI) is a vital strategy for businesses seeking to optimize their operations, enhance customer experiences, and drive growth in today’s competitive market. For retailers, particularly those operating in the F&B sector and OMO environments, the importance of CDI cannot be overlooked. It not only ensures consistency and accuracy across multiple channels but also empowers businesses to respond swiftly to customer needs and market trends. Effective CDI enhances operational efficiency, optimizes inventory management, and supports the development of targeted marketing strategies. Ultimately, CDI leads to increased customer satisfaction and loyalty. Embracing CDI is not just about technology implementation; it’s about creating a customer-centric approach that aligns with the dynamic landscape of modern commerce. SupremeTech has experience in handling data integration for businesses with millions of customers. If you're looking for integration services for large-scale system, book a free consultation with us!

      11/07/2024

      113

      Knowledge

      +1

      • Online-Merge-Offline Retail

      11/07/2024

      113

      What is Customer Data Integration (CDI) and why it is important for OMO retail?

      what is react native tab view

      Knowledge

      Software Development

      +0

        An Overview of React Native Tab View

        Hi tech fellows, it's been a while since our last blog. June is usually among the busiest times of the year as we spent time reviewing and planning for the second half of the year. With all the exciting plans ahead, we hope the rest of 2024 will be both challenging and inspiring. We'll keep you posted in the upcoming articles. But for now, let's dive in the next blog series about React Native Tab View. An Overview of React Native Tab View What is React Native Tab View? React Native Tab View is a powerful component for creating tabbed interfaces in React Native applications. It provides a highly customizable and performant solution for adding tab navigation, which is a common requirement in mobile apps. Here's an overview of its key features and components. Key Features of React Native Tab View Smooth Transitions refers to the seamless and fluid animation that occurs when switching between different tabs. This feature offers smooth and customizable transitions between tabs, enhancing user experience. Customization provides highly customizable solutions with support for styling tabs and the tab bar, allowing developers to match the look and feel of their application. Swipeable Tabs allows users to swipe between tabs, which is a common and intuitive navigation pattern on mobile devices. Lazy Loading supports lazy loading of tab content, which can improve performance by only rendering the tab content when it becomes active. This feature is crucial for apps that prioritize high performance and loading speed. Integration with React Navigation can be easily integrated with React Navigation, providing a seamless navigation experience within the app. Accessibility includes all kinds of accessibility-support features. Key Components of React Native Tab View TabView: The main component that holds the tab navigator. It manages the state and renders the appropriate tab content based on the current index. TabBar: A customizable tab bar component that displays the tab labels and handles the user interaction for changing tabs. TabBarIndicator: A component that renders an indicator under the currently active tab, providing visual feedback to the user. SceneMap: A utility function for mapping routes to their corresponding components. It helps in defining the content for each tab. Basic Usage Example import * as React from 'react'; import { View, Text, StyleSheet } from 'react-native'; import { TabView, SceneMap } from 'react-native-tab-view'; const FirstRoute = () => ( <View style={[styles.scene, { backgroundColor: '#ff4081' }]}> <Text>First Tab</Text> </View> ); const SecondRoute = () => ( <View style={[styles.scene, { backgroundColor: '#673ab7' }]}> <Text>Second Tab</Text> </View> ); export default function TabViewExample() { const [index, setIndex] = React.useState(0); const [routes] = React.useState([ { key: 'first', title: 'First' }, { key: 'second', title: 'Second' }, ]); const renderScene = SceneMap({ first: FirstRoute, second: SecondRoute, }); return ( <TabView navigationState={{ index, routes }} renderScene={renderScene} onIndexChange={setIndex} initialLayout={{ width: Dimensions.get('window').width }} /> ); } const styles = StyleSheet.create({ scene: { flex: 1, justifyContent: 'center', alignItems: 'center', }, }); Customization Tab View can be customized extensively through props and styles. You can style the tab bar, change the indicator color, customize the transition animations, and more. Here are a few common customizations: Tab Bar Styling renderTabBar={props => ( <TabBar {...props} indicatorStyle={{ backgroundColor: 'blue' }} style={{ backgroundColor: 'white' }} labelStyle={{ color: 'black' }} /> )} Custom Transitions renderScene={SceneMap({ first: FirstRoute, second: SecondRoute, })} transitionSpec={{ duration: 250, easing: Easing.out(Easing.exp), timing: Animated.timing, }} Conclusion React Native Tab View is a versatile and efficient component for implementing tab navigation in mobile apps. Its flexibility, ease of integration, and support for various customizations make it a popular choice among React Native developers. Whether you need basic tab functionality or advanced features like lazy loading and custom transitions, it provides the tools to create a polished and user-friendly tabbed interface. Contact us if you want an optimized native apps for your company!

        10/07/2024

        74

        Knowledge

        +1

        • Software Development

        10/07/2024

        74

        An Overview of React Native Tab View

        integrate-iap-in-react-native

        How-to

        Software Development

        +0

          Integrating IAP with Other Features in React Native

          Following the series about React Native IAP (In-App Purchases), in this article we will discover how to integrate IAP with other features. Integrating In-App Purchases (IAP) with other features in a React Native application can enhance user engagement and maximize revenue. This article will explore how to combine IAP with other monetization methods, sync IAP data with backend services, and use IAP data to personalize user experiences. We'll provide examples and code snippets to illustrate these integrations. Let's explore other articles in this series. Implementing IAP (In-App Purchases) in a React Native App Best Practices for React Native IAP (In-App Purchases) Combining IAP with Other Monetization Methods To diversify revenue streams, you can combine IAP with other monetization methods like ads and affiliate marketing. Example: Combining IAP with Ads You can offer an ad-free experience through IAP while still generating revenue from users who prefer the free version with ads. Integrate Ad SDK: Use a library like react-native-google-mobile-ads to display ads. import { BannerAd, BannerAdSize, TestIds } from '@react-native-google-mobile-ads'; const AdComponent = () => ( <BannerAd unitId={TestIds.BANNER} size={BannerAdSize.FULL_BANNER} requestOptions={{ requestNonPersonalizedAdsOnly: true, }} /> ); 2. Offer Ad-Free Purchase: Create an in-app purchase for removing ads. const productIds = ['com.example.remove_ads']; const buyRemoveAds = async () => { try { await RNIap.requestPurchase(productIds[0]); } catch (err) { console.warn(err.code, err.message); } }; // Example button to trigger purchase <Button title="Remove Ads" onPress={buyRemoveAds} />; 3. Conditional Rendering: Check if the user has purchased the ad-free version and conditionally render ads. const [adsRemoved, setAdsRemoved] = useState(false); useEffect(() => { const checkPurchase = async () => { const purchases = await RNIap.getAvailablePurchases(); setAdsRemoved(purchases.some(purchase => purchase.productId === productIds[0])); }; checkPurchase(); }, []); return ( <View> {!adsRemoved && <AdComponent />} {/* Other app components */} </View> ); Syncing IAP Data with Backend Services Syncing IAP data with a backend service helps maintain user purchase records, validate transactions, and provide a seamless experience across devices. Backend Setup: Create a simple backend to handle receipt validation and store purchase data. Here’s an example using Node.js and Express: const express = require('express'); const bodyParser = require('body-parser'); const app = express(); app.use(bodyParser.json()); app.post('/validate-receipt', async (req, res) => { const { receipt } = req.body; // Validate receipt with Apple/Google servers const isValid = await validateReceiptWithStore(receipt); if (isValid) { // Store purchase data in database await storePurchaseData(receipt); res.json({ success: true }); } else { res.json({ success: false }); } }); const validateReceiptWithStore = async (receipt) => { // Placeholder for actual validation logic return true; }; const storePurchaseData = async (receipt) => { // Placeholder for storing data logic }; app.listen(3000, () => console.log('Server running on port 3000')); 2. Client-Side Validation: Send the receipt to your backend for validation after a purchase. const validateReceipt = async (receipt) => { try { const response = await fetch('https://your-server.com/validate-receipt', { method: 'POST', headers: { 'Content-Type': 'application/json', }, body: JSON.stringify({ receipt }), }); const result = await response.json(); return result.success; } catch (error) { console.warn('Validation error', error); return false; } }; useEffect(() => { const purchaseUpdateSubscription = RNIap.purchaseUpdatedListener(async (purchase) => { const receipt = purchase.transactionReceipt; if (receipt) { const isValid = await validateReceipt(receipt); if (isValid) { // Complete the purchase await RNIap.finishTransaction(purchase, false); } } }); return () => { purchaseUpdateSubscription.remove(); }; }, []); Using IAP Data for Personalized User Experiences IAP data can be leveraged to personalize the user experience, making the app more engaging and tailored to individual preferences. Unlocking Features: Use IAP to unlock premium features. const [premiumUser, setPremiumUser] = useState(false); useEffect(() => { const checkPurchase = async () => { const purchases = await RNIap.getAvailablePurchases(); setPremiumUser(purchases.some(purchase => purchase.productId === 'com.example.premium')); }; checkPurchase(); }, []); return ( <View> {premiumUser ? ( <PremiumContent /> ) : ( <RegularContent /> )} </View> ); 2. Personalized Offers: Provide special offers based on past purchase behavior. const [specialOffer, setSpecialOffer] = useState(null); useEffect(() => { const fetchSpecialOffer = async () => { const purchases = await RNIap.getAvailablePurchases(); if (purchases.length > 0) { // Fetch special offer from backend based on purchase history const response = await fetch('https://your-server.com/special-offer', { method: 'POST', headers: { 'Content-Type': 'application/json', }, body: JSON.stringify({ userId: user.id }), }); const offer = await response.json(); setSpecialOffer(offer); } }; fetchSpecialOffer(); }, []); return ( <View> {specialOffer && <Text>{specialOffer.description}</Text>} </View> ); Conclusion Integrating IAP with other features in a React Native app can greatly enhance user engagement and revenue. By combining IAP with ads, syncing purchase data with backend services, and using IAP data for personalization, you create a more dynamic and user-friendly experience. Following these practices ensures that your app not only generates revenue but also provides value to your users, leading to higher satisfaction and retention.

          04/06/2024

          202

          How-to

          +1

          • Software Development

          04/06/2024

          202

          Integrating IAP with Other Features in React Native

          Customize software background

          Want to customize a software for your business?

          Meet with us! Schedule a meeting with us!