What is Customer Master Data? Customer Master Data Management Best Practices
04/11/2024
2.37k
Every business collects customer data from website sign-ups and online purchases to social media interactions. But as this data grows, it often becomes scattered across different systems and departments. Sales, marketing, and support may each hold their own version of the same customer, making it difficult to see the complete picture.
Customer Master Data Management (MDM) solves this problem by creating a single, reliable source of truth for each customer. It brings all your information together, cleans and standardizes it, and makes it accessible across your organization.
This article explains what customer master data is, explores the main types of customer data, highlights the benefits and best practices of customer master data management, and shows how to integrate customer MDM with CRM and other systems. You’ll also learn how SupremeTech can help you build a unified data foundation for smarter business decisions.
>>> See more:
- What is Customer Data Integration (CDI) and why is it essential for OMO retail?
- What is Middleware Integration for CDI? | Benefits and Examples
- How to Build a Cloud-Based Customer Data Pipeline for Omnichannel Retail
What is Customer Master Data?
Customer master data is a centralized, comprehensive dataset about a company’s customers. It includes key details such as contact information, billing and shipping addresses, financial profiles, account identifiers, and interaction history. In short, it captures the key attributes that define your customers and how they engage with your business.
This data serves as a single source of truth (SSoT) across the entire organization. It ensures that every department (sales, marketing, finance, and customer service) accesses the same accurate, consistent, and up-to-date information. When correctly managed, customer master data eliminates duplicate records, prevents errors, and connects customer interactions across channels and systems.
Unlike transactional data, which records one-time activities such as purchases or service requests, customer master data remains stable and reusable. It’s the foundation that supports business operations, enhances customer experience, and fuels decision-making.
Effective customer master data management (MDM) helps businesses maintain this centralized accuracy by continuously cleaning, enriching, and synchronizing data across platforms. When managed correctly, it not only improves customer service and marketing performance but also strengthens compliance, analytics, and strategic planning.

Types of Customer Master Data
A strong customer master data management strategy starts with understanding the kinds of data you need to unify. Below are the key types that form a complete picture of each customer.
1. Basic identifying information
This includes a customer’s name, address, phone number, and email address, as well as unique identifiers such as a customer ID or account number. These elements are the foundation for matching and merging data across systems.
2. Demographic Data
Demographic details such as age, gender, income, education level, and location help you segment and understand your audience more deeply. They support marketing, personalization, and forecasting strategies.
3. Behavioral Data
Behavioral data captures customer interactions, such as browsing history, purchase frequency, purchase recency, app usage, and social media interactions. This type of data is valuable for predicting future behavior, personalizing offers, and improving the customer experience.
4. Transactional Data
Transactional data shows a customer’s purchase history, payment methods, order frequency, and lifetime value. It connects customer identity with their commercial relationship with your company. Transactional data is essential for analytics, financial reporting, and assessing customer lifetime value.
5. Engagement Data
Engagement data includes information about how customers interact with the brand across various touchpoints. It can be website visits, email opens, ad clicks, social media interactions, customer service inquiries, and loyalty program activity. This helps businesses understand customer engagement and loyalty.
6. Preferences and Interests
This type of data captures what customers prefer or are interested in. It can vary by favorite product categories, language preferences, notification settings, content interests, and communication frequency. It’s handy for personalization and customer experience management.
7. Account and Membership
For businesses with loyalty programs or membership systems, this includes information related to membership tiers, reward points, account status, and customer preferences within the loyalty program. These elements strengthen long-term relationships and are key to customer retention strategies.
8. Customer Feedback
This data includes customer reviews, feedback, survey responses, and sentiment analysis from social media or other platforms. It provides insights into customer satisfaction, product improvement needs, and brand perception.
9. Customer Service and Support Data
Support tickets, chat logs, complaint records, and resolution histories reveal how well you serve your customers. Integrating this data into your customer master record ensures that every interaction is informed and empathetic.Together, these data types create the foundation for a 360-degree customer view—a single, comprehensive record that drives consistent experiences across all touchpoints.
What Is Customer Master Data Management (Customer MDM)?
Customer Master Data Management (MDM) is the process of consolidating, cleaning, and managing all customer-related data to maintain one accurate version of the truth across your organization.
It involves people, processes, and technology working together to ensure that every department — from marketing to operations — uses consistent, reliable customer data.
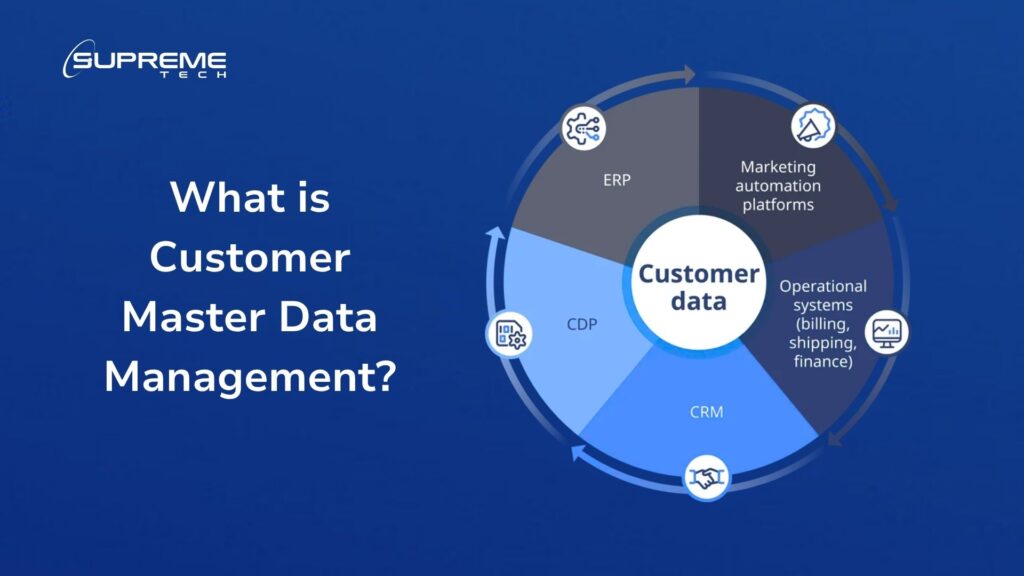
In practical terms, customer MDM connects data from multiple systems such as CRM, ERP, marketing automation, and support platforms. It then cleanses, standardizes, and synchronizes this information into a single database known as the “master record.”
This master record is continuously updated and shared across systems, eliminating inconsistencies and ensuring that every customer-facing team sees the exact, accurate details.By implementing customer master data management best practices, organizations can reduce data duplication, improve analytics, and deliver highly personalized experiences that build trust and loyalty.
Why Customer MDM Matters
Customer Master Data Management matters because it ensures that everyone in an organization, from sales to customer service, works with the same, accurate, and consistent customer information. When data is fragmented across systems, businesses struggle to understand their customers, deliver personalized experiences, or make informed decisions. By unifying and maintaining customer master data, companies can streamline operations, improve communication, and build stronger customer relationships.
Here’s why customer master data management is essential for retail businesses:
Improved customer experience
When every system shares the same correct information, customers receive consistent communication, faster service, and more relevant recommendations. For example, a support agent can instantly see a customer’s order history and resolve an issue without asking repetitive questions.
Better decision-making
Good data means good decisions. When your customer information is accurate and complete, managers can plan better marketing campaigns, predict customer needs, and set clear business goals. Reliable data reduces guesswork and supports smart strategies.
Increased operational efficiency
Without customer master data management, teams often spend time fixing data errors or searching for the right information. A single, clean data source removes this problem. Everyone works faster because they trust the data they see.
Stronger compliance and data security
Regulations such as GDPR and local data laws require companies to manage customer data carefully. With strong customer MDM in place, it’s easier to protect sensitive information and ensure all records comply with the correct rules and privacy standards.
Higher profitability
With a complete view of each customer, you can identify cross-sell and upsell opportunities, reduce churn, and target high-value segments more effectively. This often leads to higher sales and stronger long-term relationships.
Best Practices for Customer Master Data Management
Building an effective Customer Master Data Management (MDM) system is not just about technology. It’s about having clear rules, responsibilities, and processes that keep your customer information accurate and useful. Below are key best practices that help organizations create reliable data foundations and deliver better business outcomes.
1. Establish a Single Source of Truth
The first step in customer master data management is to ensure everyone in the company works from a single version of the truth. When customer data is scattered across different systems, errors and duplicates appear. A single, centralized master record ensures all departments—sales, marketing, finance, and support—see the same accurate information. This consistency builds trust, improves teamwork, and helps every team deliver a better customer experience.
2. Define Strong Data Governance and Ownership
Good data depends on good management. Data governance means defining who owns customer data, how it’s created, and when it’s updated. Assigning roles such as data stewards ensures accountability and consistency. With transparent governance, your company can maintain high-quality data over time instead of constantly fixing errors. It also makes compliance and reporting far easier.
3. Focus on Data Quality: Cleanse, Standardize, and Enrich
High-quality customer data is the foundation of every successful business decision. Unfortunately, many organizations struggle with duplicate records, missing fields, and inconsistent formats. Poor data quality not only wastes time but can also lead to failed campaigns, inaccurate reports, and frustrated customers.
To overcome this, companies must continuously cleanse and standardize their customer master data. Deduplication processes remove duplicate entries, while data validation tools ensure that addresses, email addresses, and contact details are correct. Standardization enforces consistent formats across all systems, making integration and analytics far easier.
You can also enrich data with additional information, such as demographics or preferences, to make it more valuable. High-quality data improves decisions, saves time, and helps your teams work confidently.
4. Integrate Customer Master Data Across All Systems
Customer information often lives in many systems, including CRM, ERP, marketing tools, or support platforms. Integrating these systems ensures updates in one place appear everywhere else. This not only prevents data silos but also gives your business a clear, unified view of every customer. Well-planned integration creates smoother operations, faster communication, and a consistent experience at every touchpoint.
5. Protect Customer Data and Ensure Privacy Compliance
With privacy laws like GDPR, CCPA, and others growing stricter worldwide, data protection must be a core principle of customer master data management best practices. Customer master data often includes sensitive information such as contact details, payment preferences, and transaction histories. Mishandling this data can damage your reputation and lead to serious penalties.
Strong security and privacy practices, such as encryption, access controls, and regular audits, help keep sensitive data safe. Compliance with data protection laws also builds customer trust and prevents costly penalties. When customers know their information is handled responsibly, they’re more likely to stay loyal to your brand.
6. Monitor, Audit, and Continuously Improve
Customer information changes constantly. People move, update their email addresses, or change their buying habits. That’s why customer MDM should be an ongoing process. Regular audits and data-quality reports help catch issues early. Collecting user feedback, reviewing governance policies, and adjusting integration flows all help keep your data clean and reliable. Continuous improvement ensures your customer data always supports your business goals.

Integrating Customer MDM with CRM and Data Systems
Integrating Customer Master Data Management (MDM) with CRM and other data systems helps create a complete and accurate customer view. The goal is to make your master record the single trusted source that keeps all platforms (CRM, ERP, marketing, and support) aligned.
Start by identifying where customer data lives and how these systems connect. Clean and standardize records before integration to avoid spreading duplicate or incorrect information. Use APIs or data pipelines to automatically synchronize updates so that changes made in one system are reflected everywhere.
Regularly monitor data flow and fix sync issues early. As your business grows, review and adjust these integrations to include new tools or channels. When done right, integration eliminates silos, improves collaboration, and ensures that every department uses the same reliable customer data.
Challenges in Customer Master Data Management
Managing customer master data comes with several challenges. One major issue is inconsistent or incomplete data collected from different systems. When customer details vary between departments, it becomes challenging to create a single, accurate record.
Duplicate records are another common problem. The same customer might appear multiple times under slightly different names, which leads to confusion, wasted effort, and poor decision-making.
Data quality is also a continuous challenge. Outdated, missing, or incorrect information can damage trust and make analytics unreliable. Regular cleansing and validation are necessary to maintain accuracy.
Integration adds complexity. Customer data often exists across CRM, billing, and support platforms. Without proper synchronization, each system holds a different version of the truth.
Finally, organizational resistance and lack of data ownership can slow progress. Successful customer MDM requires collaboration, clear roles, and strong governance to ensure everyone values and maintains data quality.
How SupremeTech Can Help Your Businesses
At SupremeTech, we understand that managing customer data isn’t just about technology. It’s about creating business value through clarity, trust, and connection.
Our Custom Software Development service helps organizations design and implement customer master data management solutions tailored to their needs. Whether you want to build a centralized MDM system from scratch or integrate your customer master data into CRM, ERP, and analytics platforms, our experts can make it happen.
We combine deep technical expertise with practical business insight to ensure your MDM initiatives deliver measurable impact. From designing clean data architectures to automating validation and synchronization, SupremeTech helps you create a single source of truth for all your customer information.
Our developers work with modern tools and cloud technologies, ensuring your data flows securely and seamlessly across systems. With strong governance frameworks and performance optimization, we help you transform raw customer data into actionable insights that drive growth.
When your data is accurate, your decisions are smarter, your customer experience is stronger, and your operations are more efficient. That’s the power of mastering your customer data, and that’s where SupremeTech can help you lead.
>>> Explore our expertise:
- From Raw Data to Perfect API Responses: Serialization in NestJS
- How to Upgrade Aurora MySQL Databases: Lessons Learned from SupremeTech
- Enhance the Customer Experience on Digital Platforms While Protecting the Legacy for Luxury Brands

Future Trends in Customer Master Data Management
Managing customer master data effectively is more critical than ever, and several trends are shaping how businesses approach it today. Here are the key current trends:
Moving to the Cloud
Cloud-based MDM (Master Data Management) solutions have taken off, and for good reason. With cloud, businesses can scale up (or down) as needed, access data from anywhere, and reduce costs. Plus, it’s easier to keep data up to date in real time, which is a game-changer for fast-paced retail environments.
Using AI to Clean and Understand Data
Artificial intelligence is helping clean up messy customer data by detecting duplicates, filling in blanks, and identifying patterns we might miss. Machine learning tools analyze behavioral trends and even predict what a customer might want next, making personalization much more intuitive.
Real-Time Data Updates
Today’s customers expect immediate responses, and for that, real-time data updates are essential. Integrating systems so that customer data refreshes instantly allows businesses to provide relevant offers or support as soon as it’s needed. In other words, no more outdated data holding back customer experience.
Customer Data Platforms (CDPs) for a Clearer View
CDPs pull customer data from multiple sources into one spot, creating a single, reliable profile for each customer. This unified view allows teams across sales, support, and marketing to deliver a consistent experience. As CDPs become more accessible, even smaller businesses can leverage this organized approach.
In short, companies are aiming to make data more accessible, accurate, and actionable, with a focus on real-time updates, privacy, and smarter, AI-powered insights. The result? Better customer experiences, more efficient operations, and a competitive edge.
>>> Read more: Understanding Key Differences Between Customer Data Platform vs Data Lake
Seeking ways to manage customer data effectively?
Knowing the importance of data sometimes does not mean knowing where to start. Even our clients who built an empire in retail struggle to manage data efficiently. The common pain point, as we translated it, is how to build a data pipeline that runs stably and responsively. Furthermore, trust and security are also the head-wrenching problem, especially when seeking external help.
We proudly offer the best of both. Schedule a meeting with us to know how we can proclaim with such confidence.
Conclusion
Customer Master Data Management is more than a technical exercise. It’s a strategic foundation for every modern business that values accurate insights and personalized customer experiences.
By understanding the different types of customer master data, following proven best practices, and integrating your systems effectively, your organization can build a single, reliable source of truth.
Clean, connected data doesn’t just reduce complexity—it unlocks opportunity. With the right partner, you can turn your customer master data into a competitive advantage that fuels lasting success.
FAQs
What Is Customer Master Data?
Customer master data is a centralized and consistent set of information about your customers, including their contact details, billing and shipping addresses, financial information, and interaction history. It acts as a single source of truth shared across departments and systems.
What Are Common Data Sources for Customer Data?
Common data sources include CRM systems, ERP platforms, e-commerce databases, customer support tools, marketing automation software, and billing systems. Integrating these systems helps create a complete and accurate customer profile.
What Are the Key Components of Customer MDM?
Key components include data integration, cleansing, deduplication, governance, and ongoing quality management. Together, they create a trusted, unified view of each customer across the organization.
How Can Businesses Get Started with Customer MDM?
Start by identifying where customer data exists, assessing its quality, and defining governance roles. Then, integrate data systems, apply cleansing processes, and maintain regular audits to keep data accurate over time.